 PHP: Deploy with GitHub Actions
How to deploy your PHP code using GitHub Actions
👋 Welcome to the Stackhero documentation!
Stackhero offers a ready-to-use PHP cloud solution that provides a host of benefits, including:
- Deploy your application in seconds with a simple
git push.- Use your own domain name and benefit from the automatic configuration of HTTPS certificates for enhanced security.
- Enjoy peace of mind with automatic backups, one-click updates, and straightforward, transparent, and predictable pricing.
- Get optimal performance and robust security thanks to a private and dedicated VM.
Save time and simplify your life: it only takes 5 minutes to try Stackhero's PHP cloud hosting solution!
GitHub Actions is a powerful tool that allows you to automate your workflows, including deploying your PHP code directly to your production servers. In this guide, we will show you how to securely deploy your PHP application to both staging and production environments using GitHub Actions.
The recommended approach is to maintain two branches in your repository: staging and production. Each time you push code to these branches, it will be automatically deployed to the corresponding Stackhero instance.
Having a staging instance is not mandatory. However, using both staging and production instances is strongly recommended to ensure smooth deployments and greater confidence when deploying to production. This practice is in line with industry standards and helps reduce risks.
To get started, you will need a GitHub account with your PHP code hosted in a repository.
Creating the PHP services
First, log in to your Stackhero dashboard and create two PHP services, one for staging and one for production. For clarity, you may want to rename these services to "Production" and "Staging".
If you do not have a Stackhero account yet, you can create one for free in just two minutes and deploy your PHP cloud services with just a few clicks.
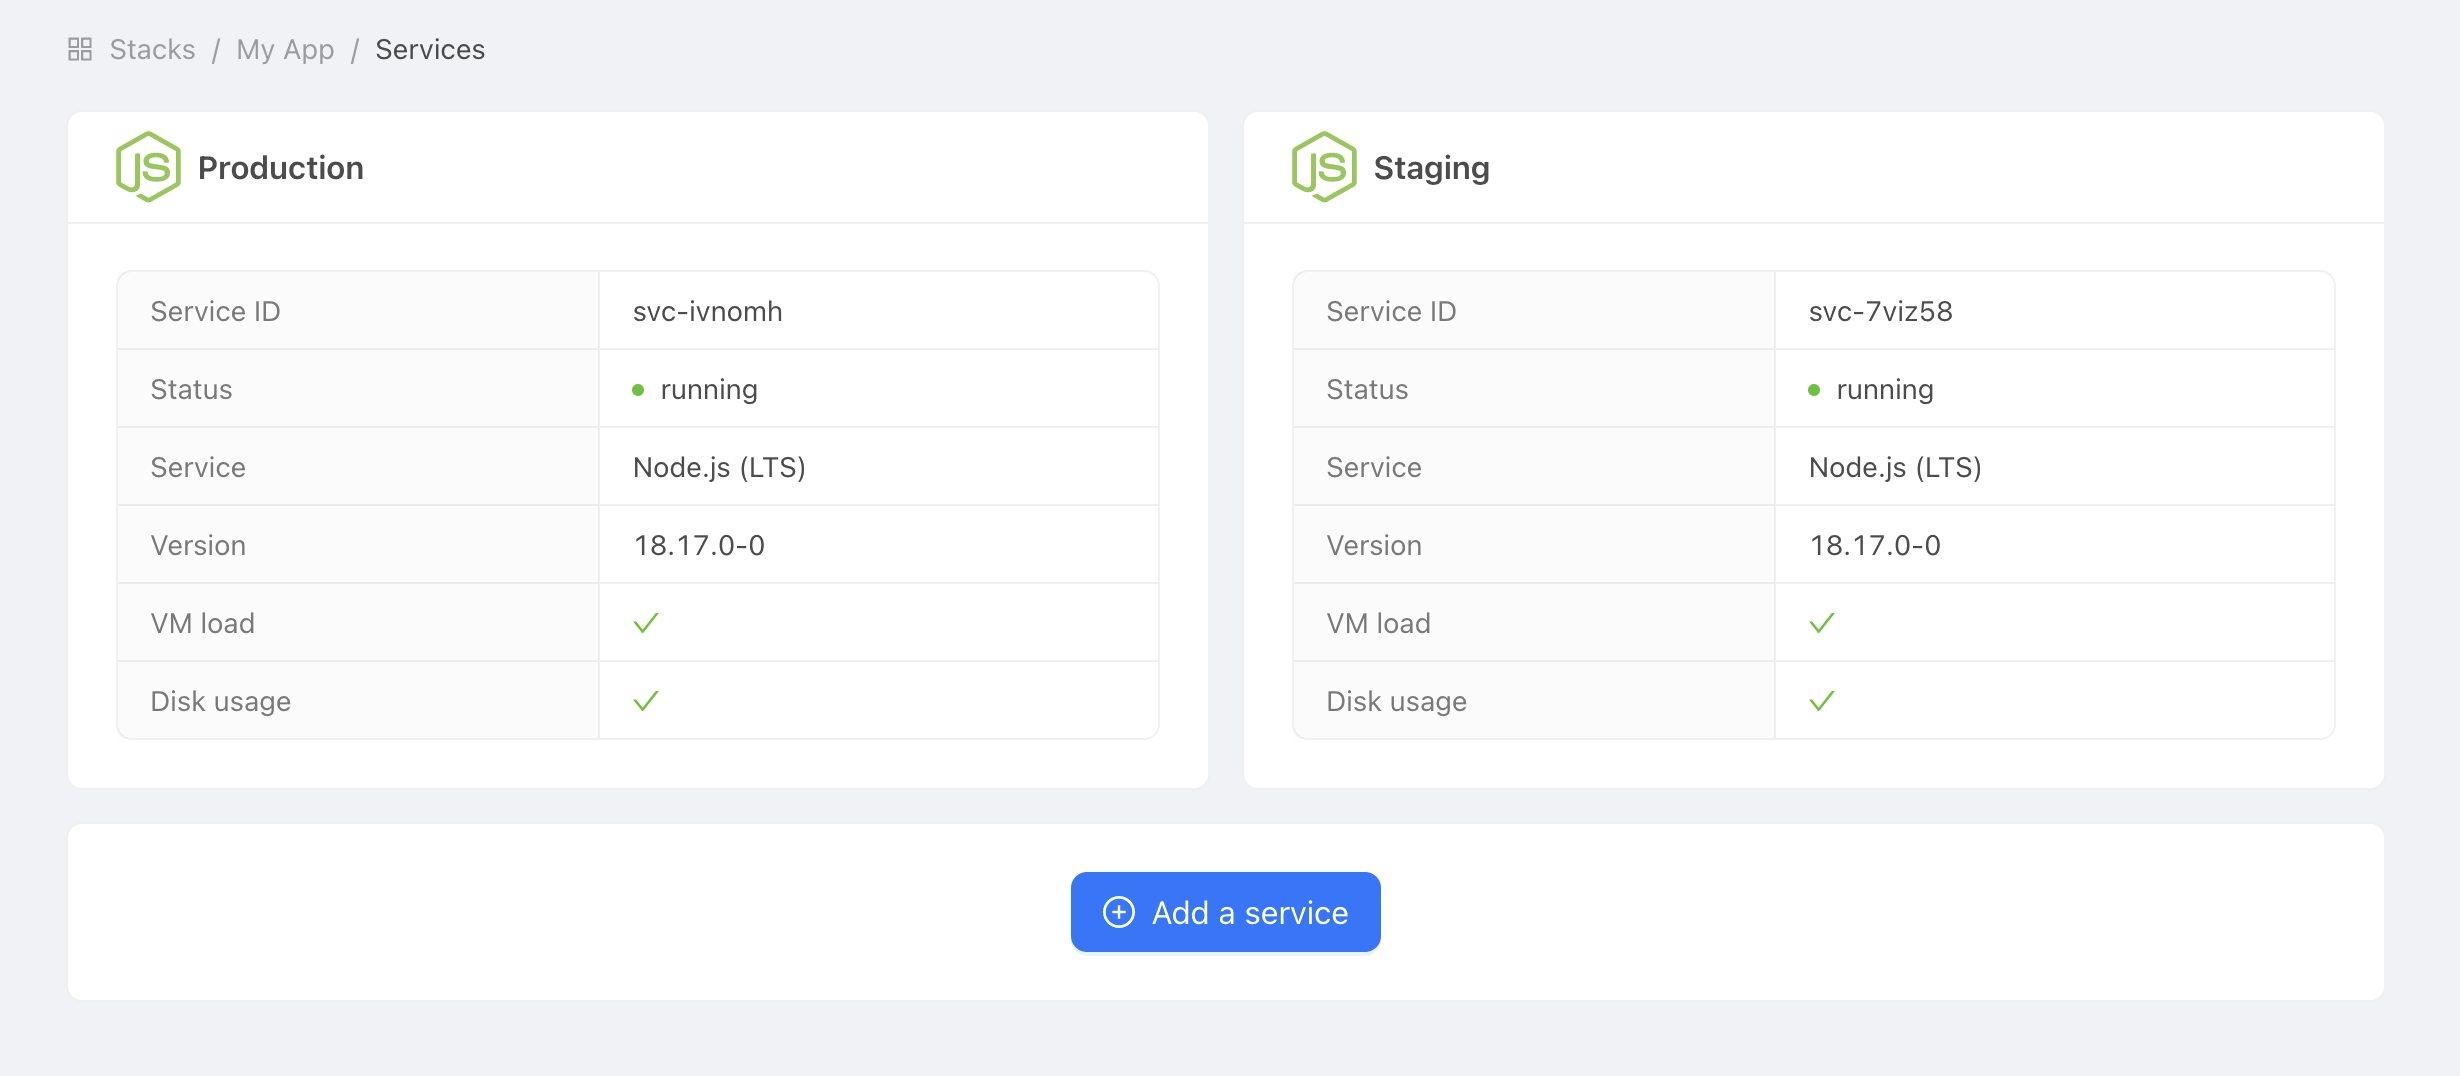 Example of production and staging services
Configure SSH keys
SSH keys are the recommended method for allowing GitHub Actions to securely connect to your PHP service during deployment. In this guide, you will create a dedicated SSH key pair for this purpose.
Generate SSH keys
To generate new SSH keys, run the following command on your computer:
ssh-keygen -C "" -f /tmp/ssh_key -N ""
Set the public key
Next, retrieve the public key by running:
cat /tmp/ssh_key.pub
Go to your Stackhero dashboard and select your "Production" PHP service. Click on "Configure" and follow these steps:
- Under
SSH public keys, click on "Add a public key". - Set the
Descriptionto "GitHub Action". - Paste the public key you just retrieved into the
Keyfield.
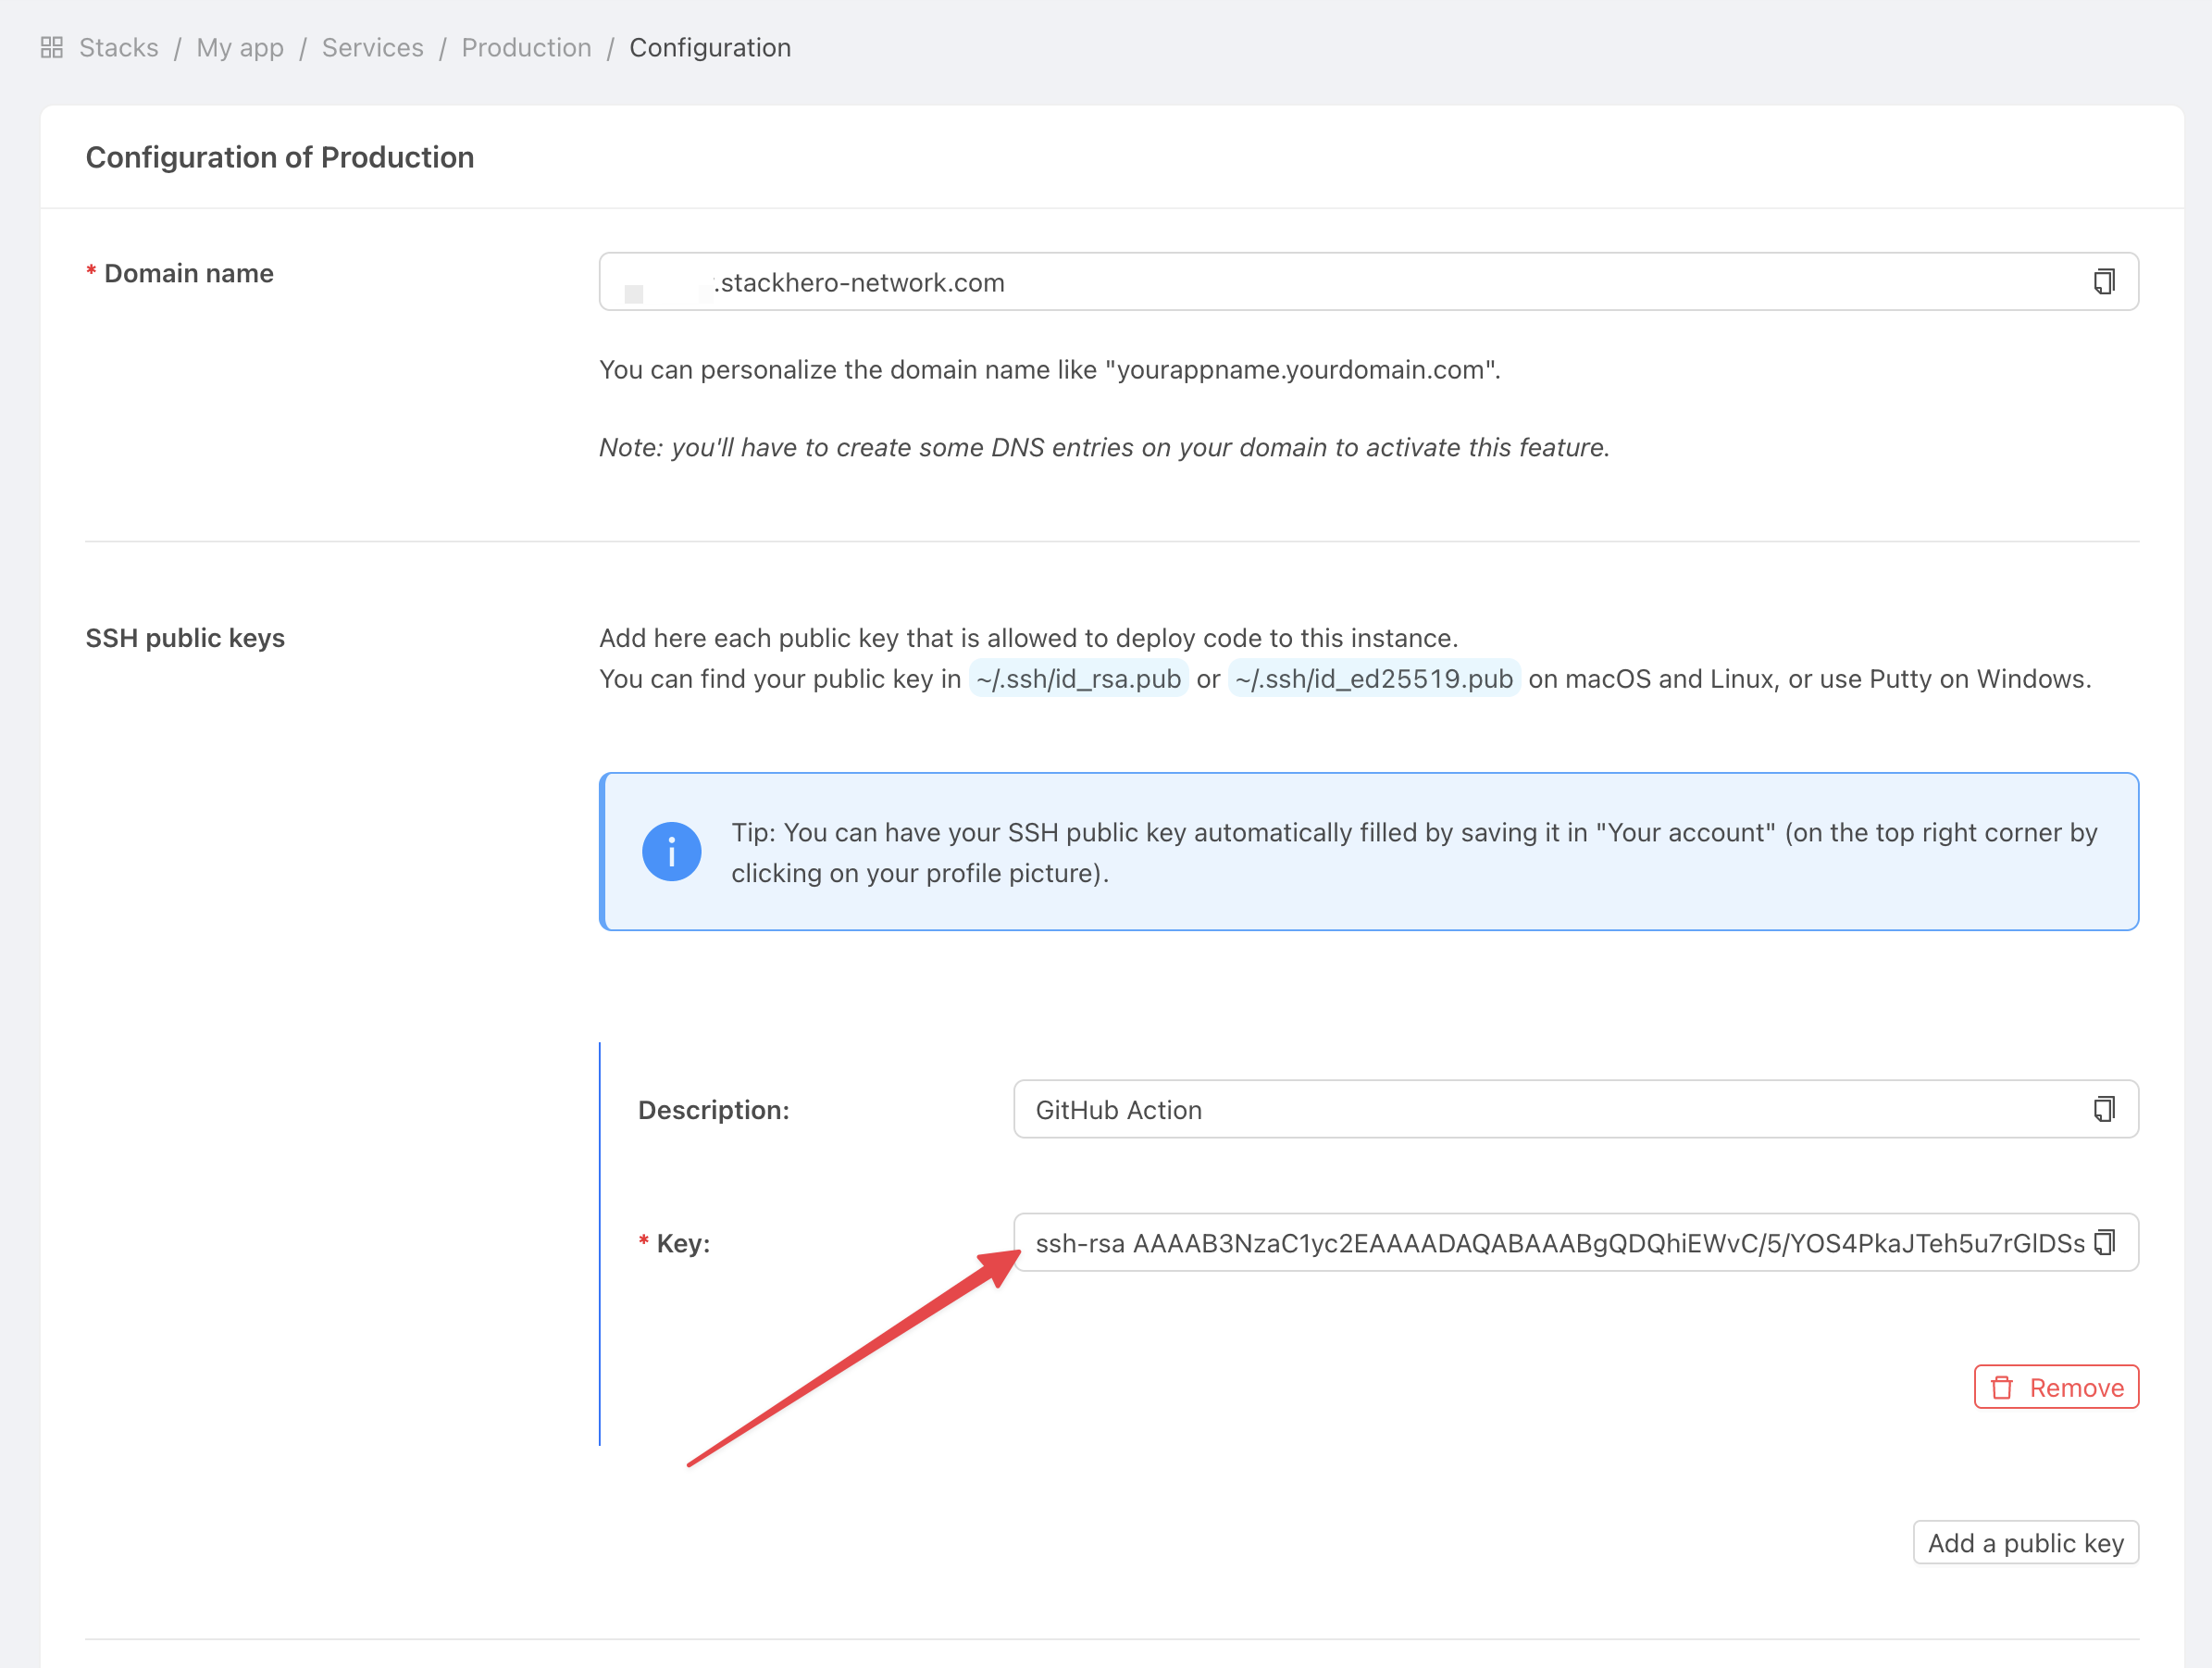 Get service settings
Set the private key
Now, add the private key to your GitHub project so it can be used during deployment:
-
Go to
Settings, then selectEnvironmentsand click onNew environment.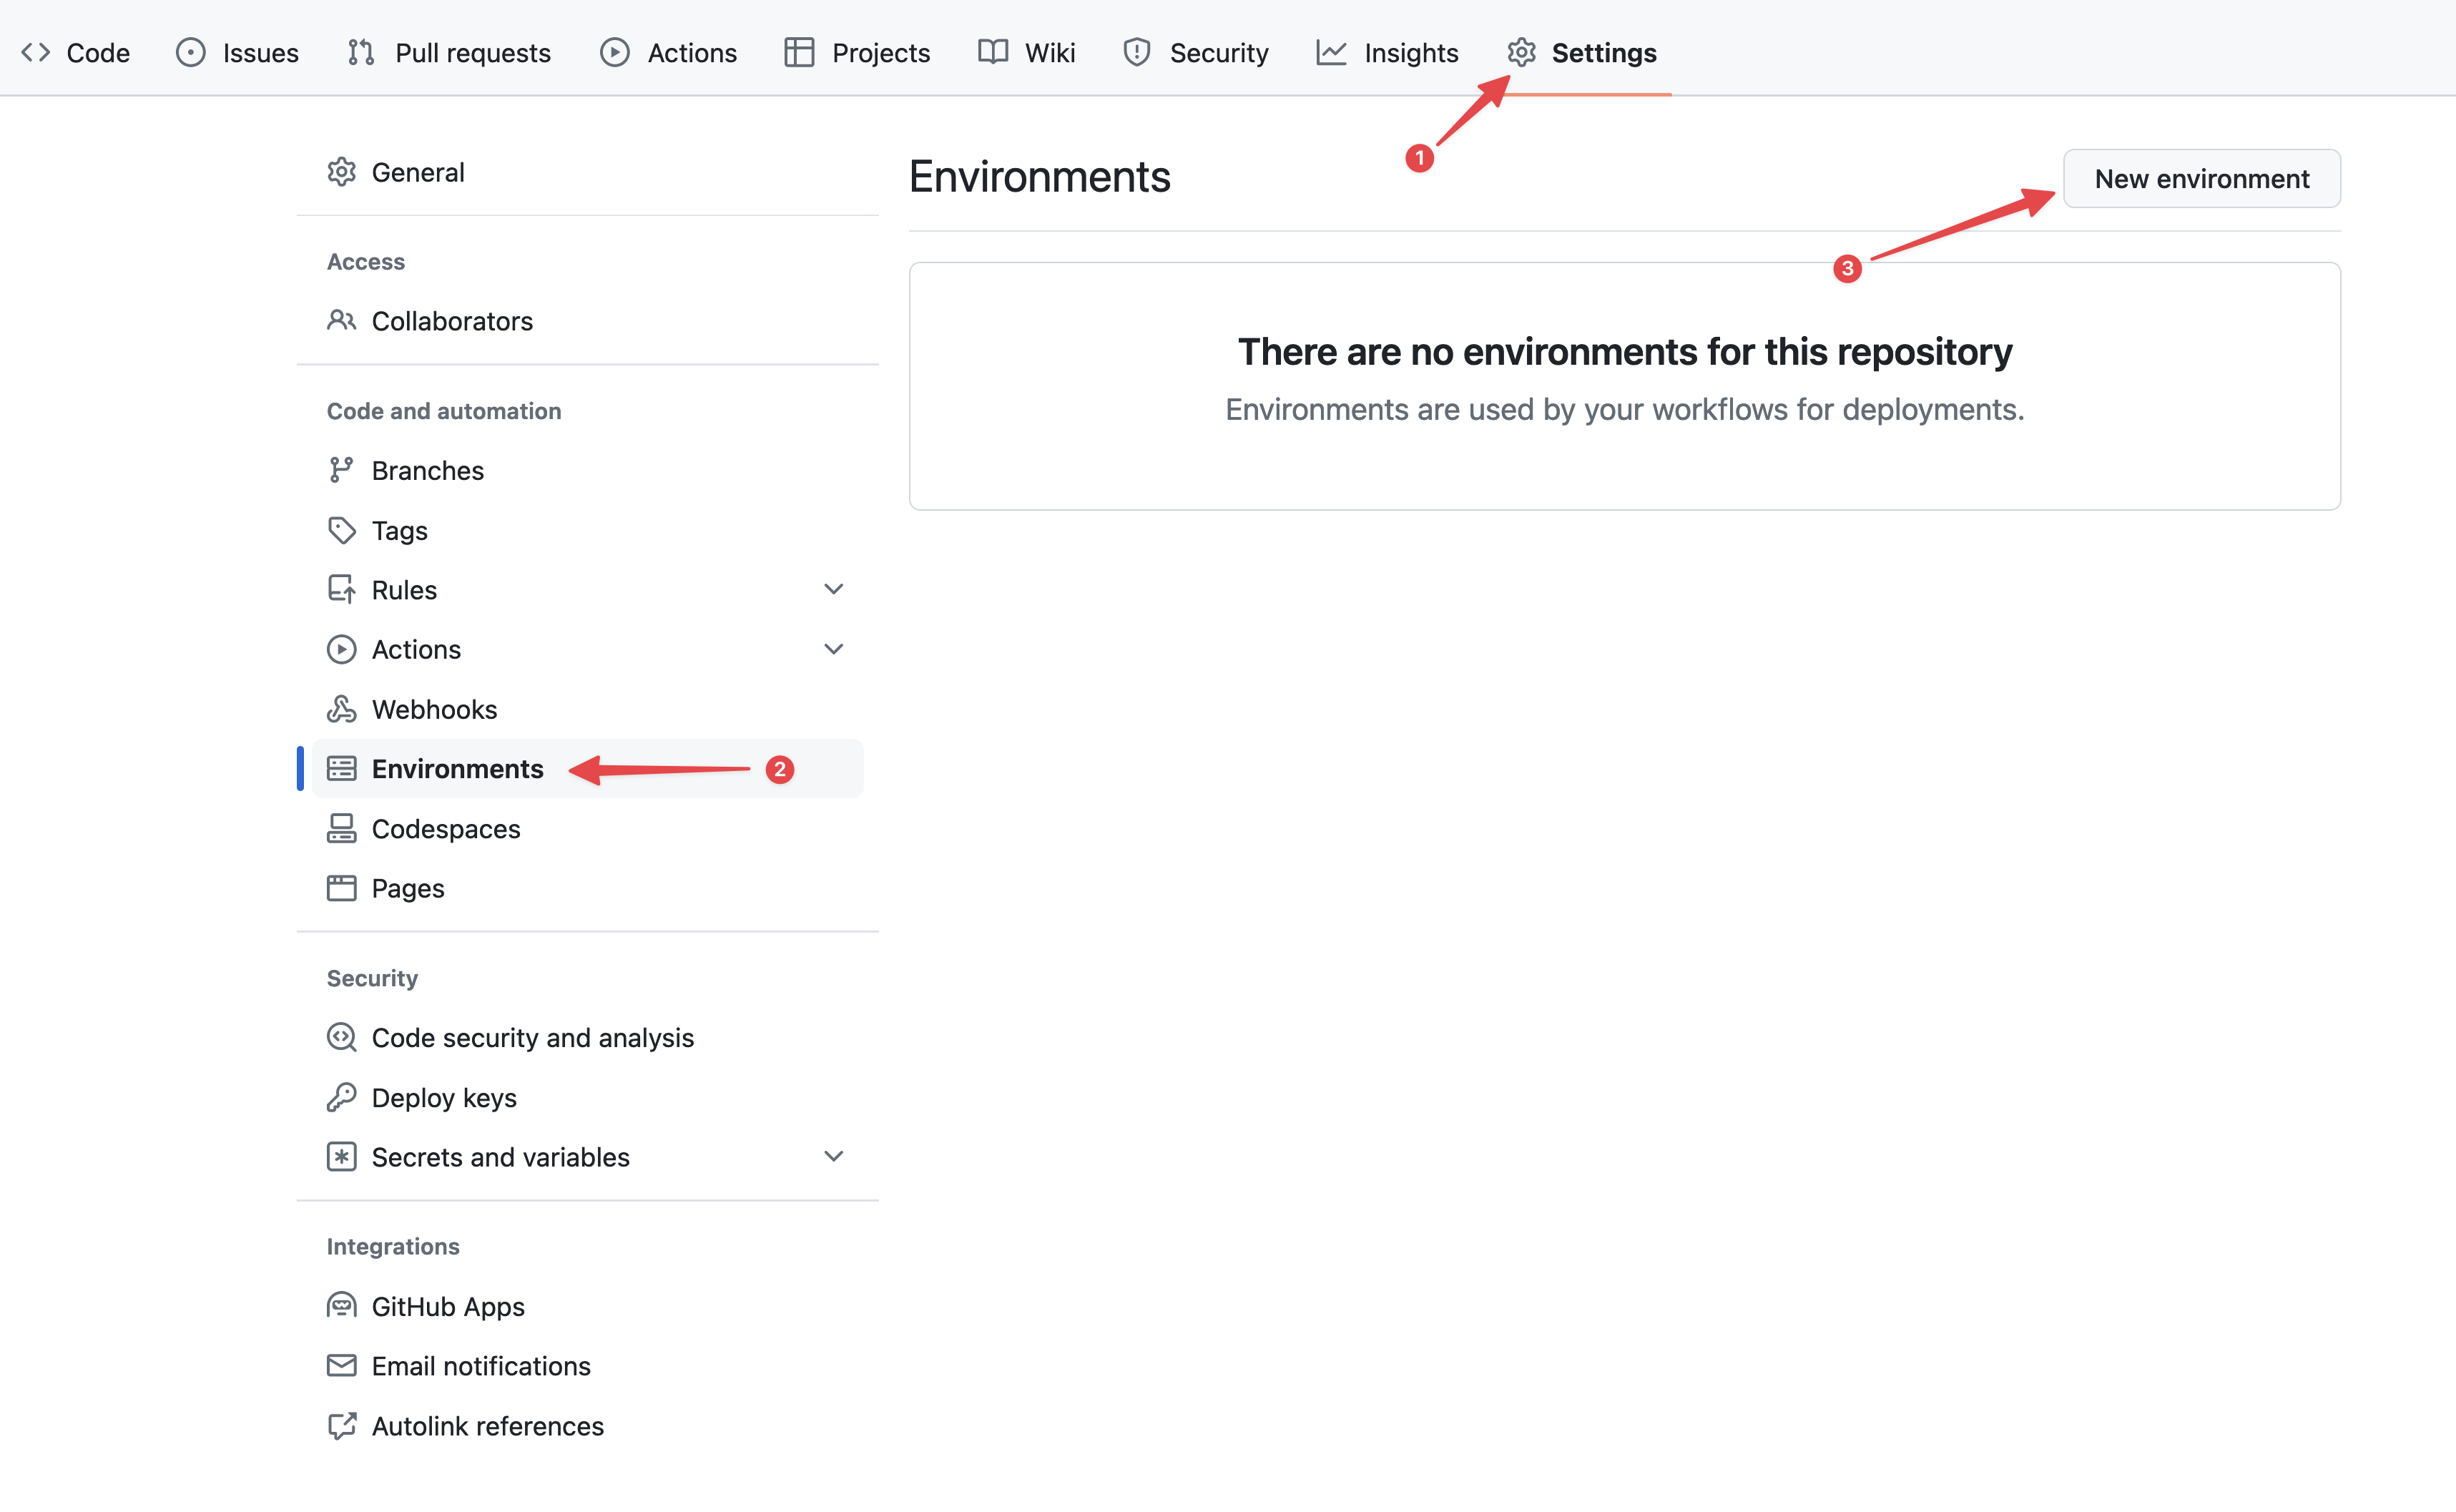 Configuring GitHub environments
 -
In the
Namefield, enter "production" and confirm.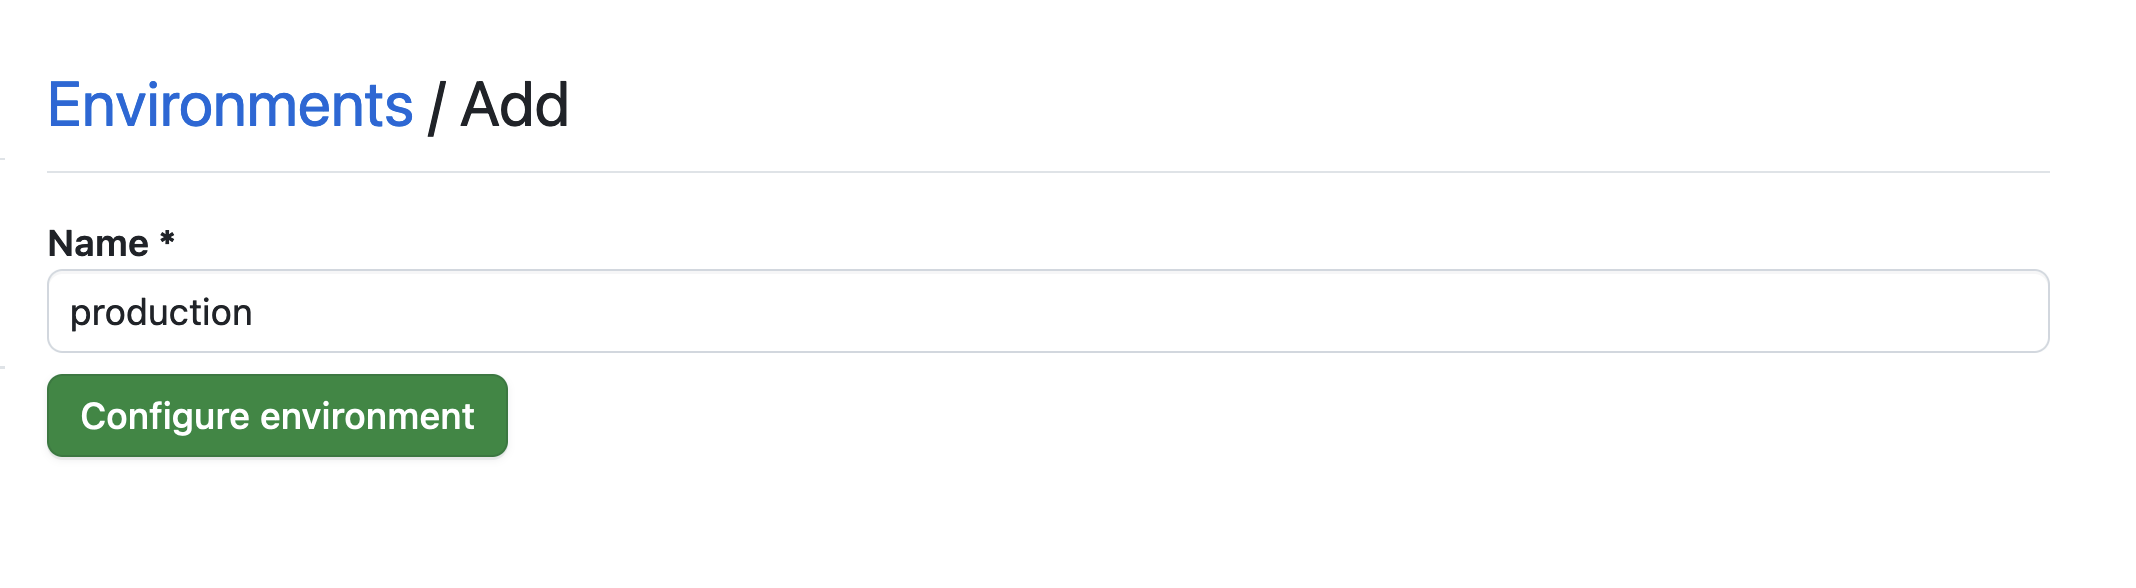 Setting the environment
 -
Click on the
No restrictionbutton and selectSelected branches and tags.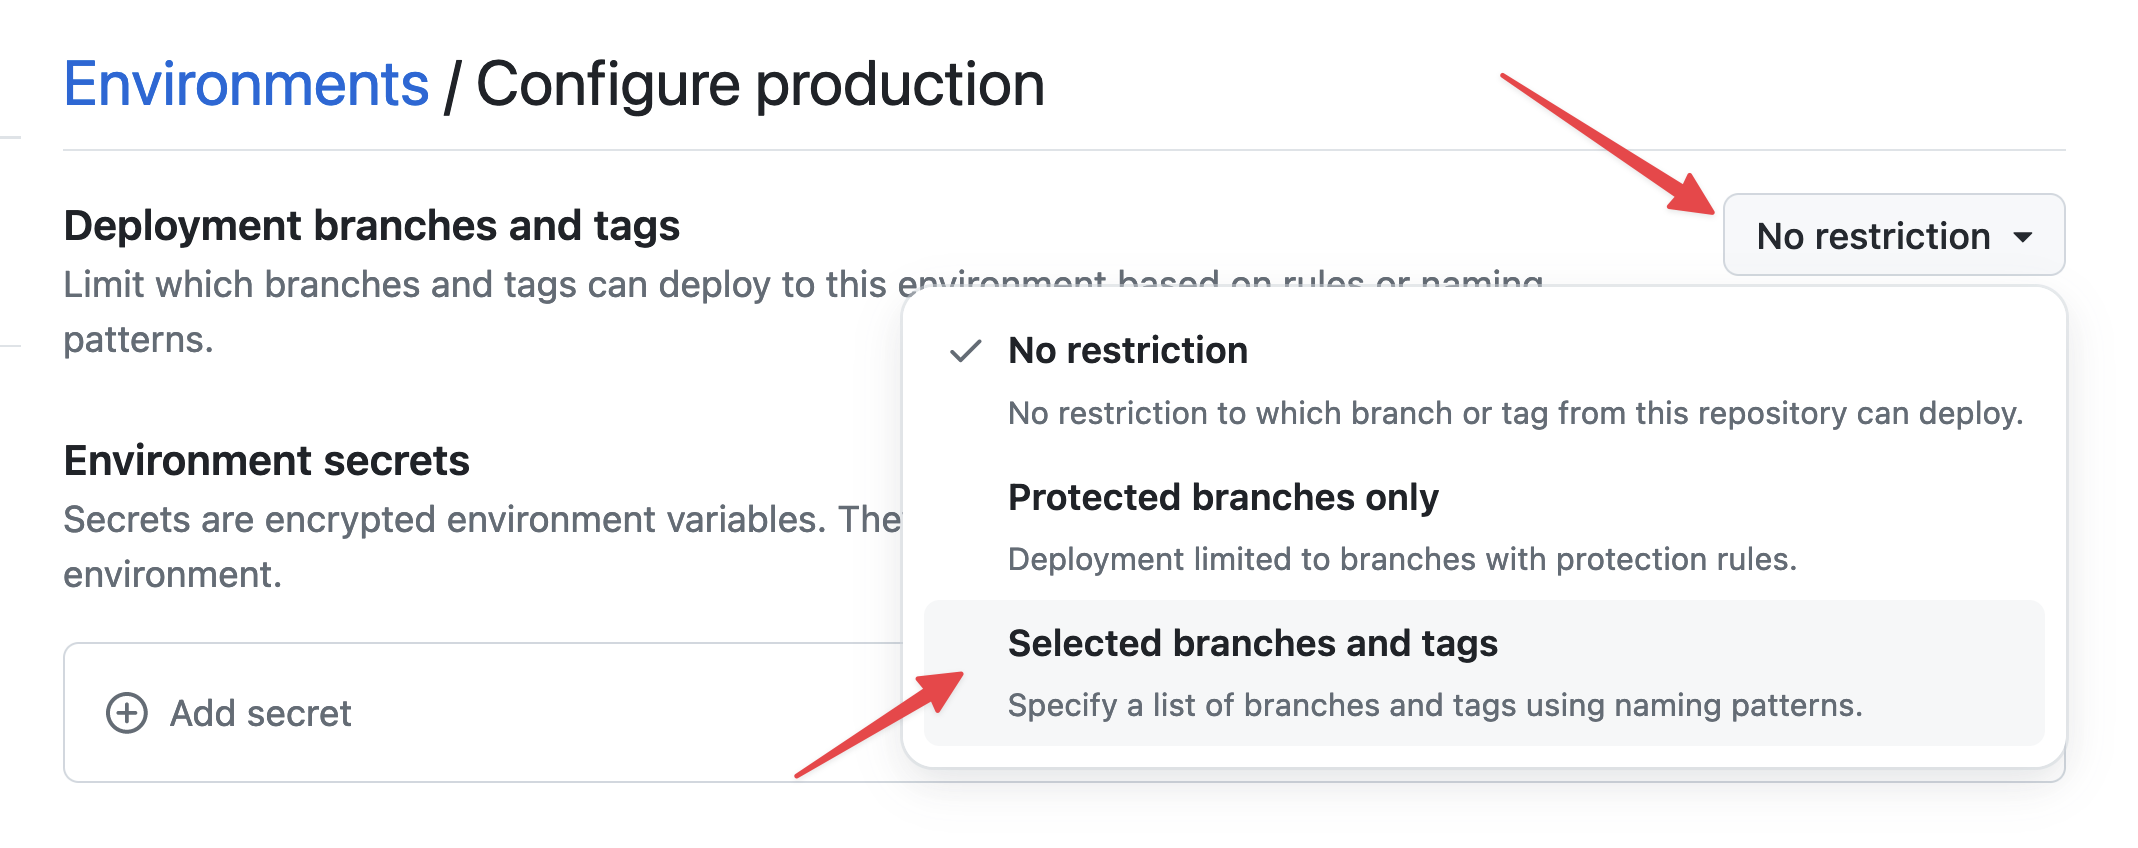 Setting environment restrictions
 -
Click on
Add deployment branch or tag rule, enter "production" in theName patternfield, and click onAdd rule.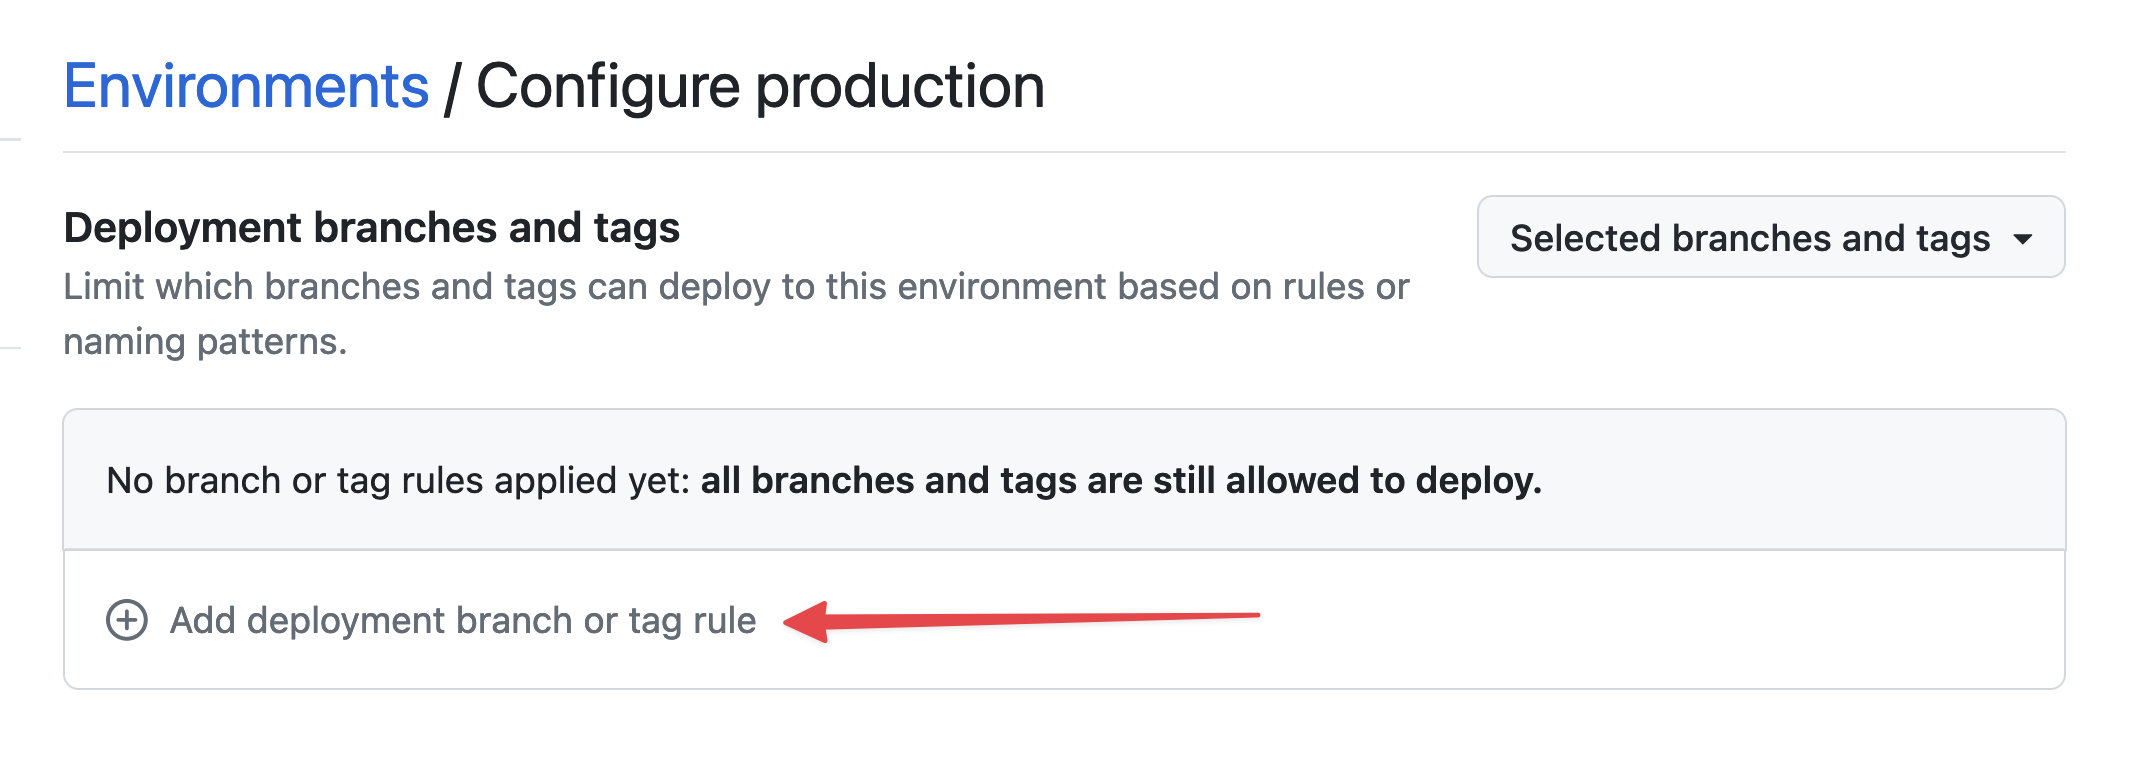 Setting environment branch
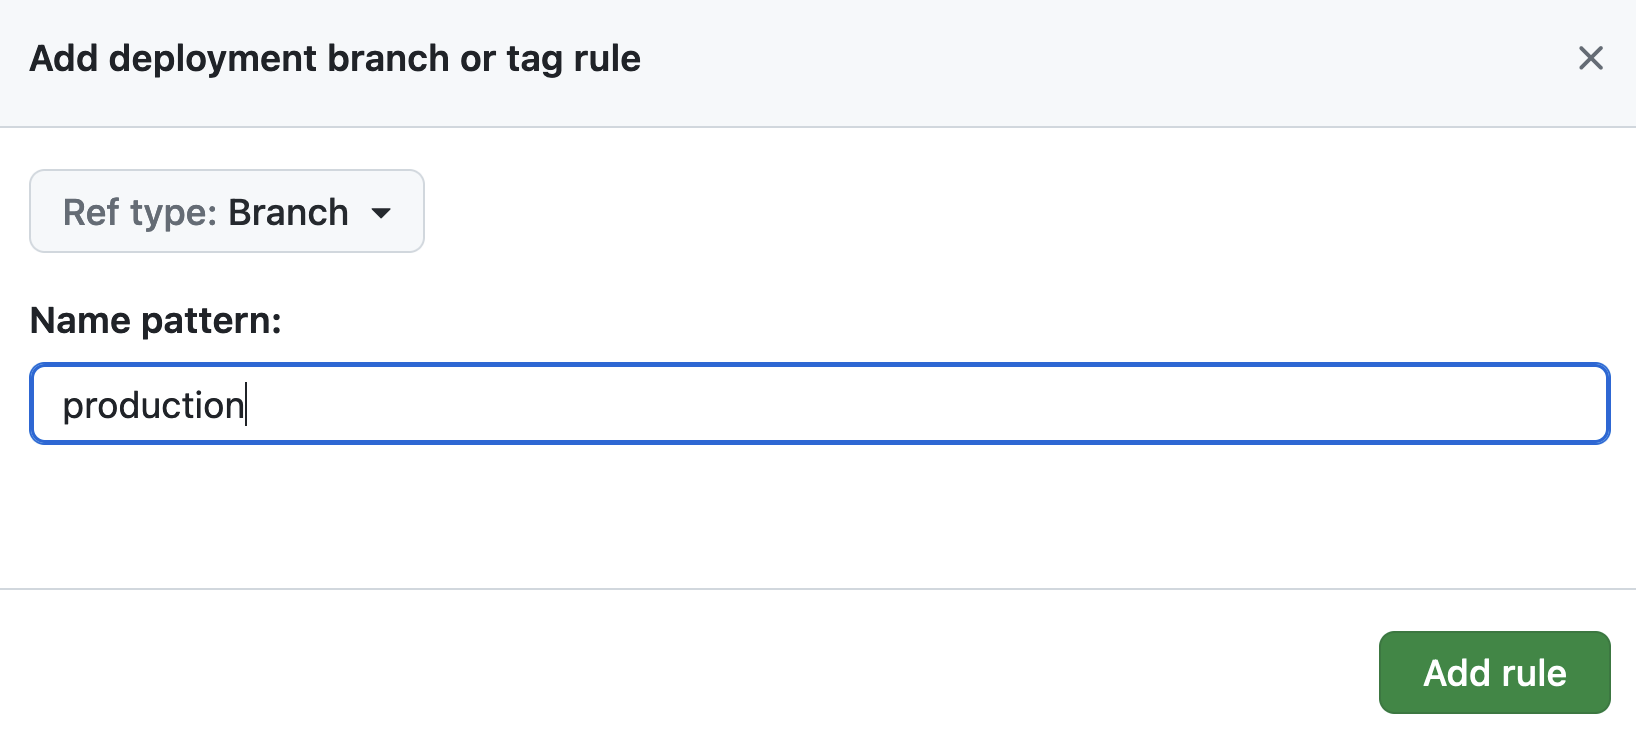 Setting environment branch
 -
Under
Environment secrets, click onAdd secret.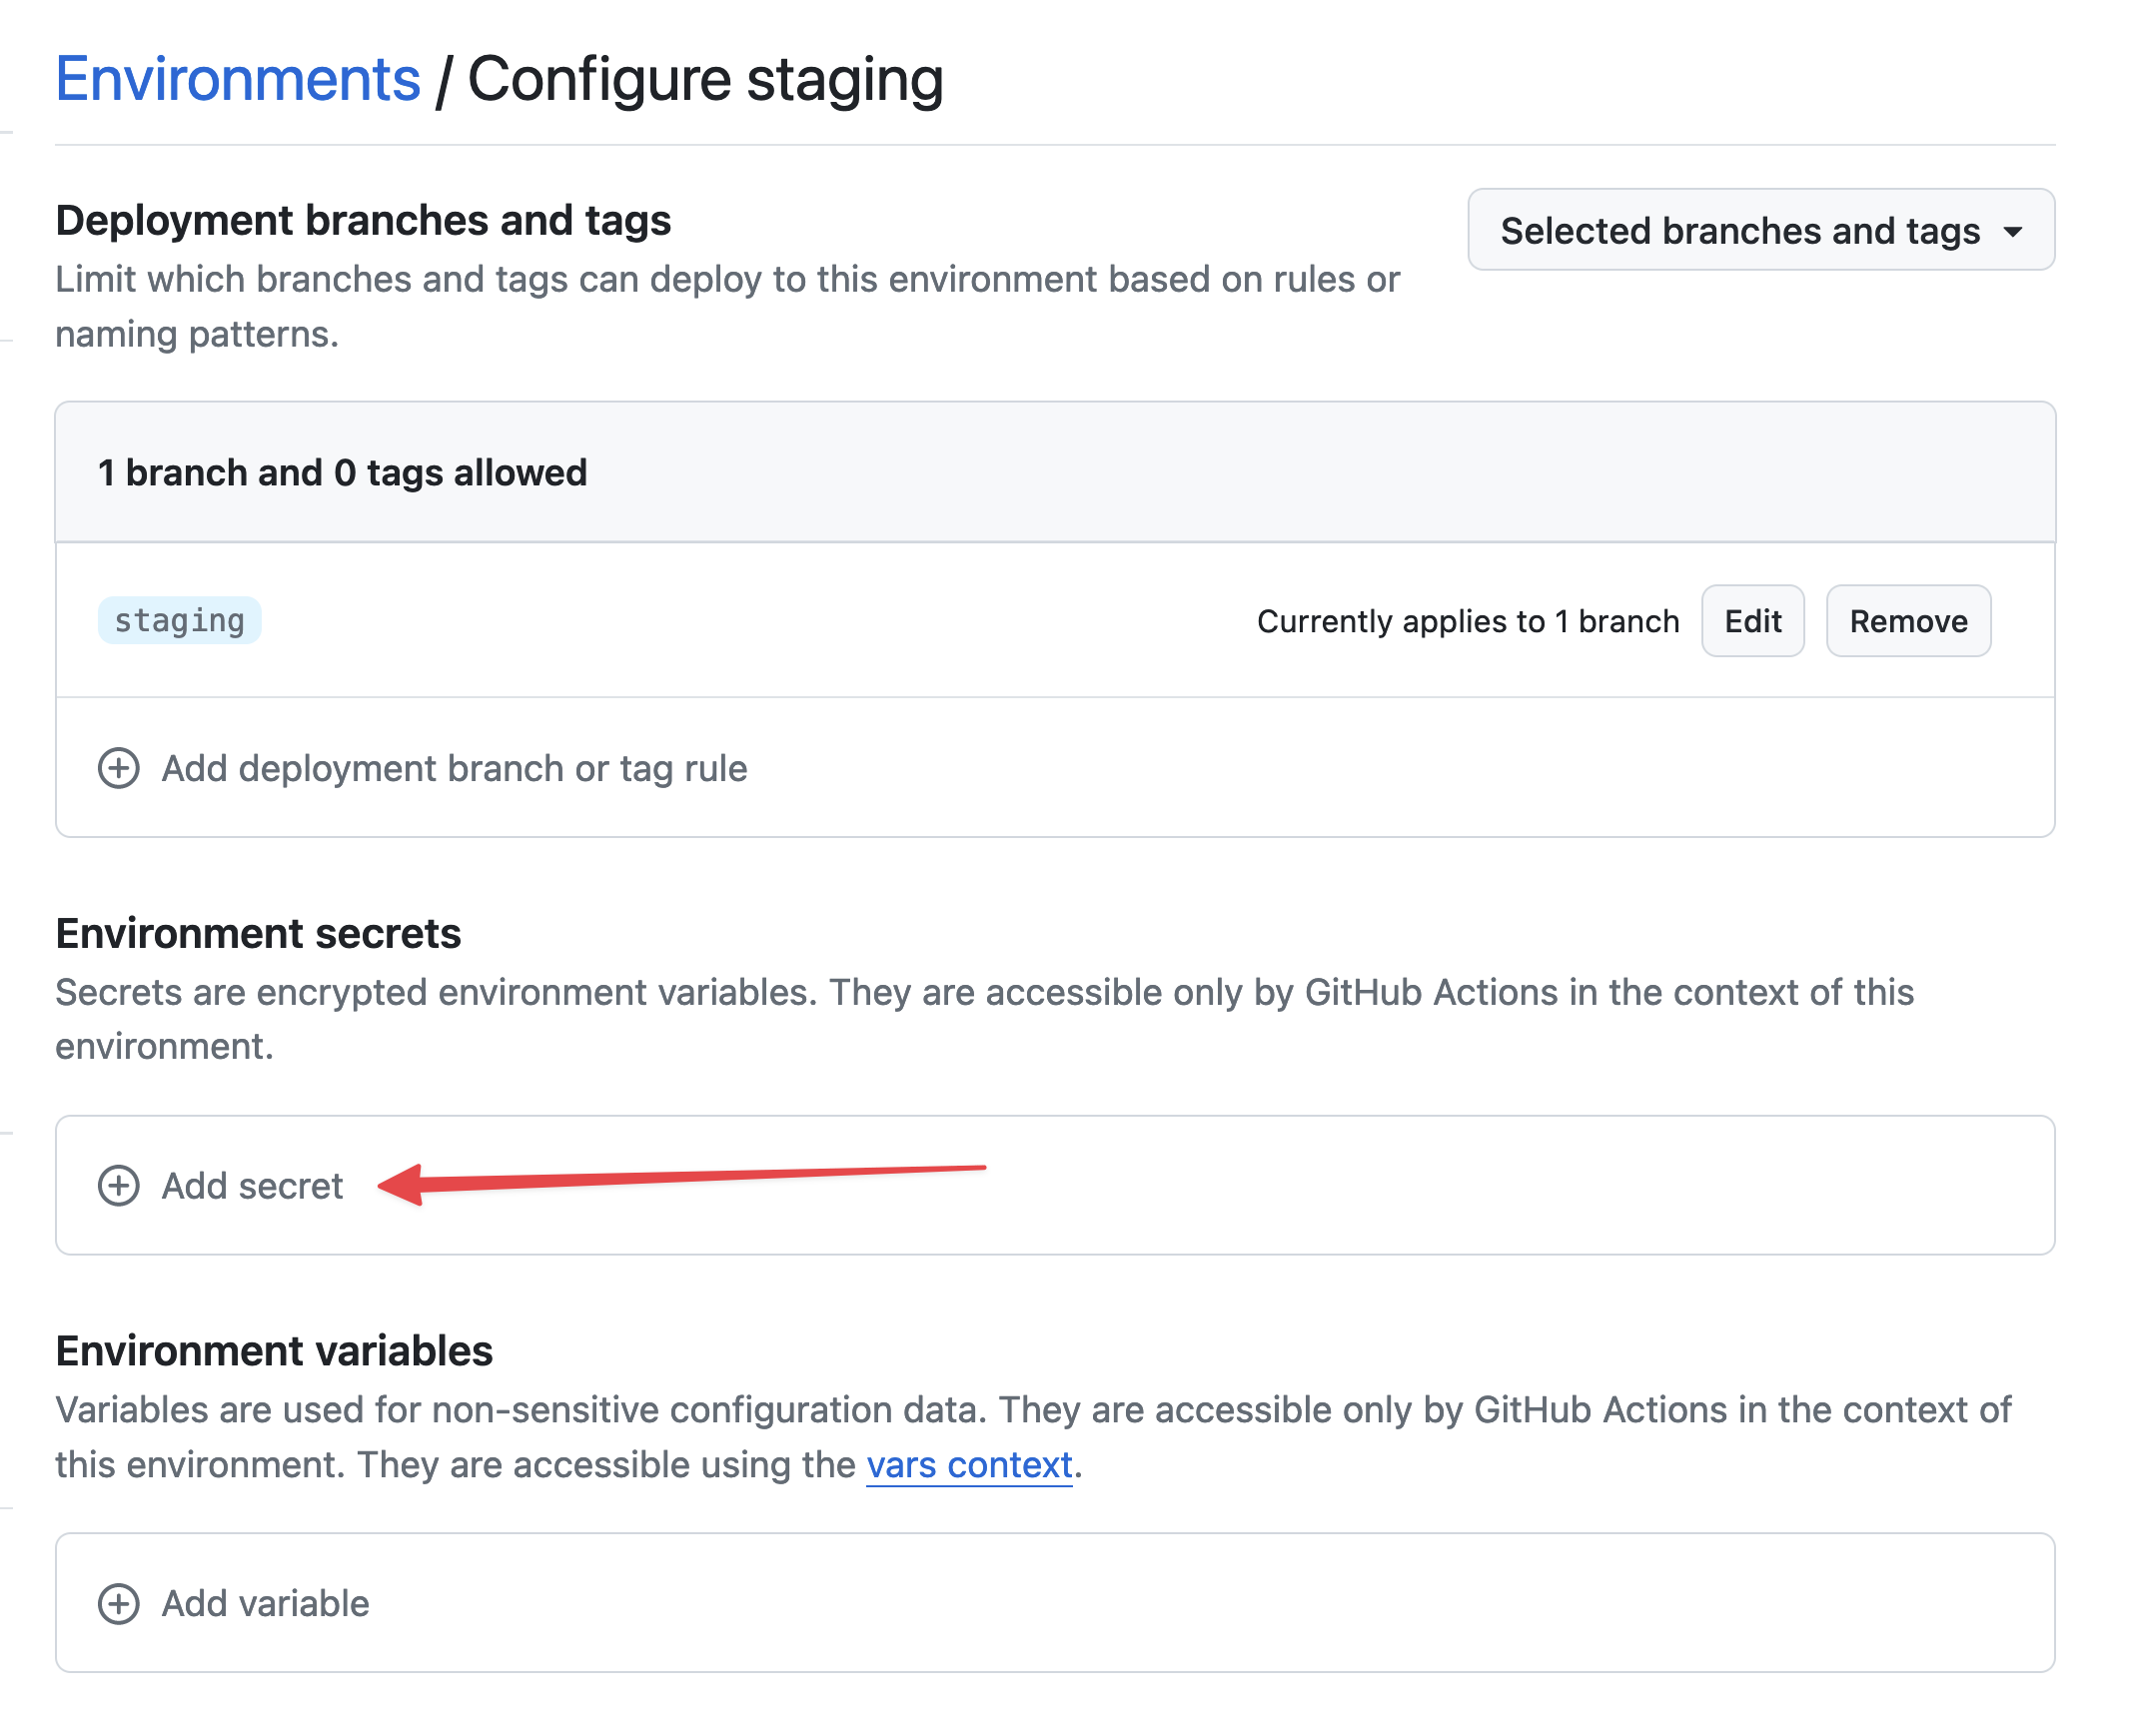 Add secret
Retrieve the private key you generated earlier by running:
cat /tmp/ssh_key
In the GitHub environment settings:
-
For
Name, enterSTACKHERO_SSH_PRIVATE_KEYand paste your private key into theValuefield.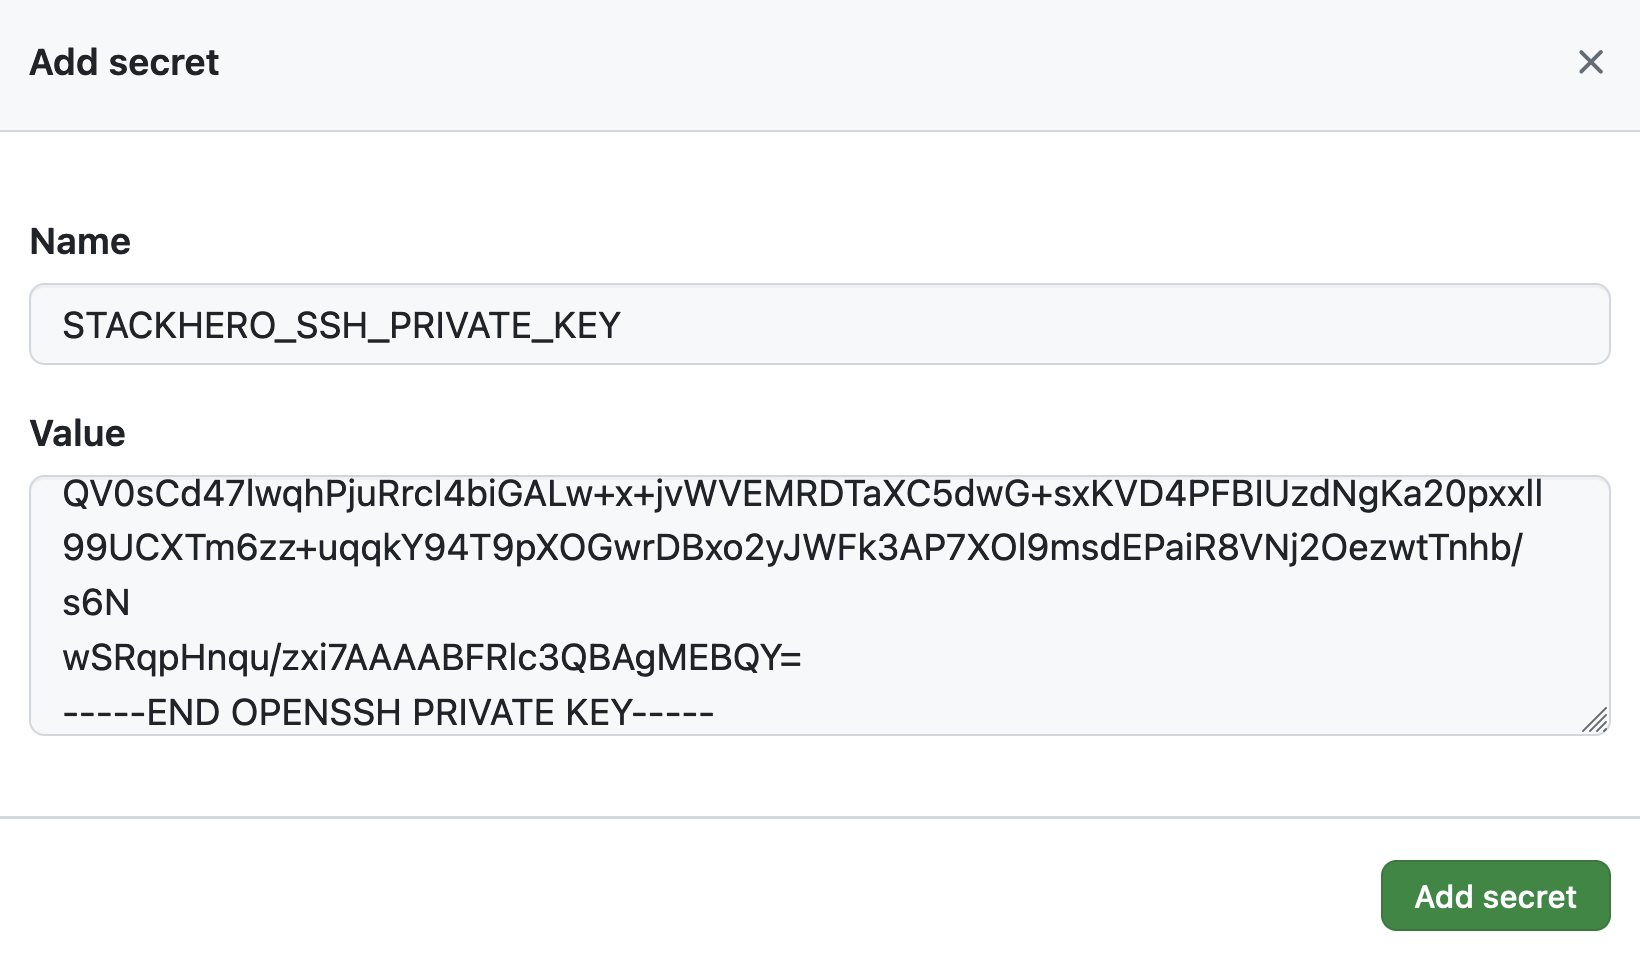 Setting the SSH private key secret
 -
In the
Environment variablessection, click onAdd variable.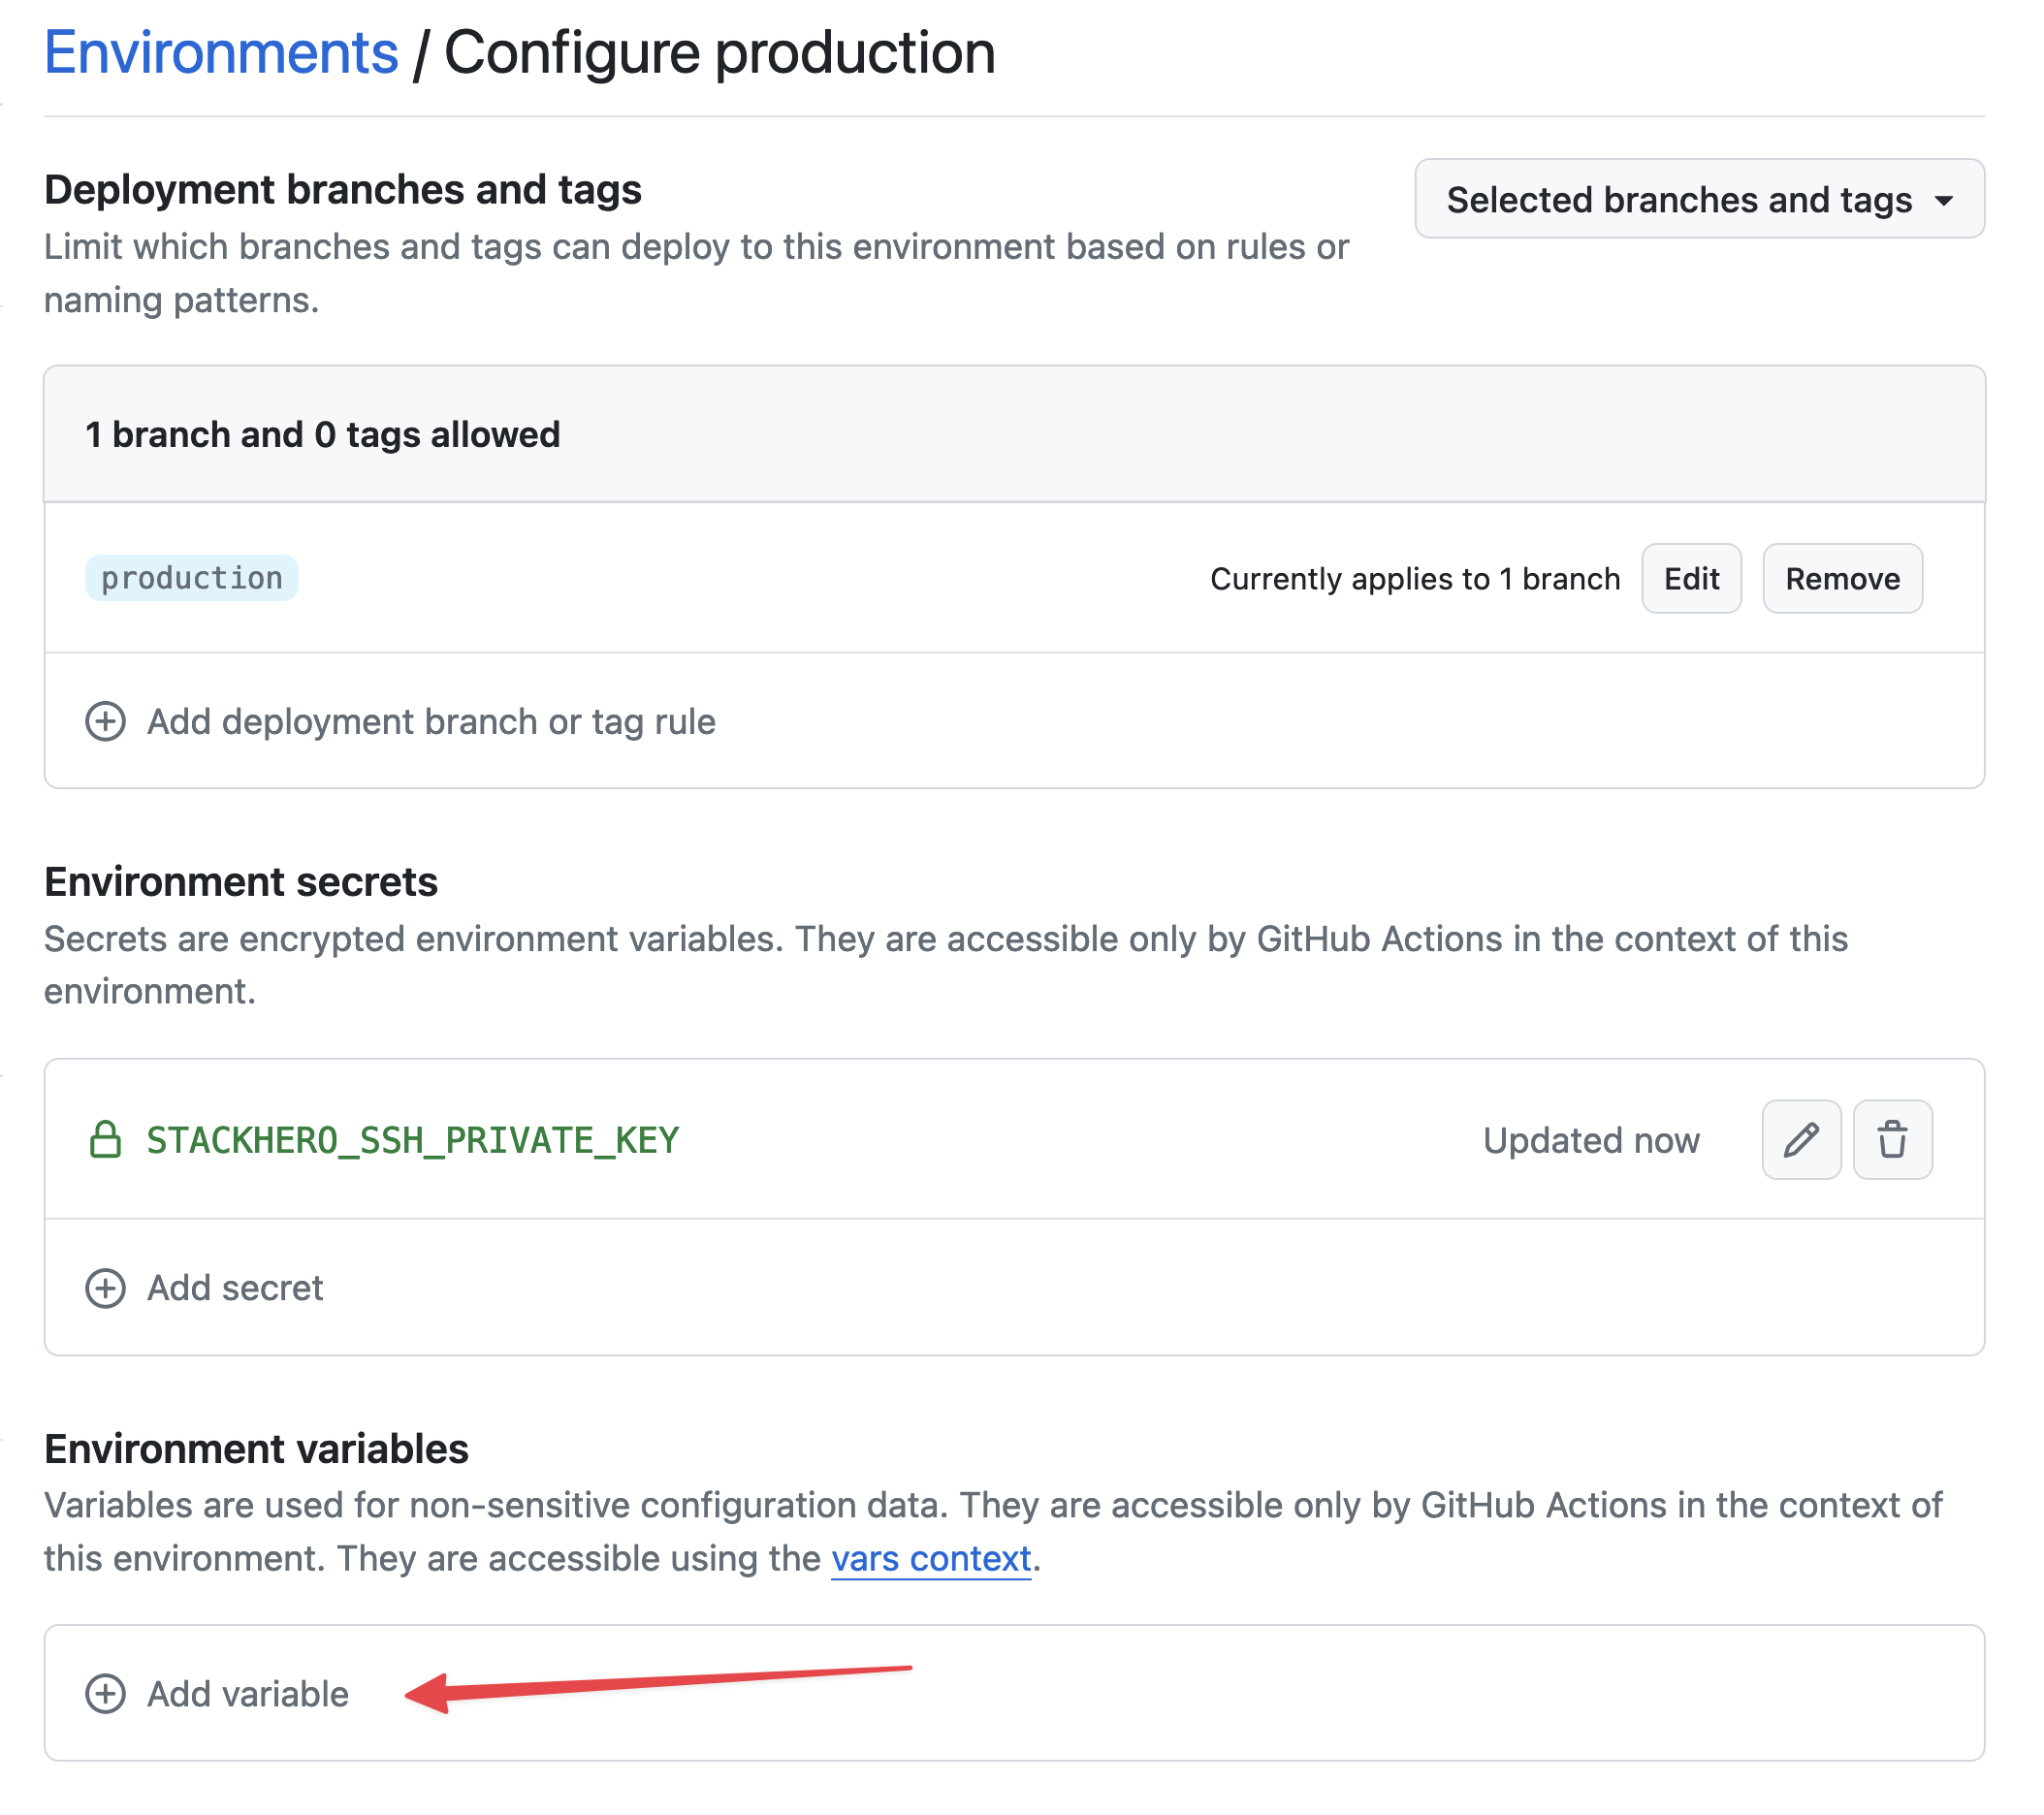 Setting variables
 -
For
Name, enterSTACKHERO_ENDPOINTand paste your PHP service endpoint into theValuefield. You can find this endpoint in your Stackhero dashboard.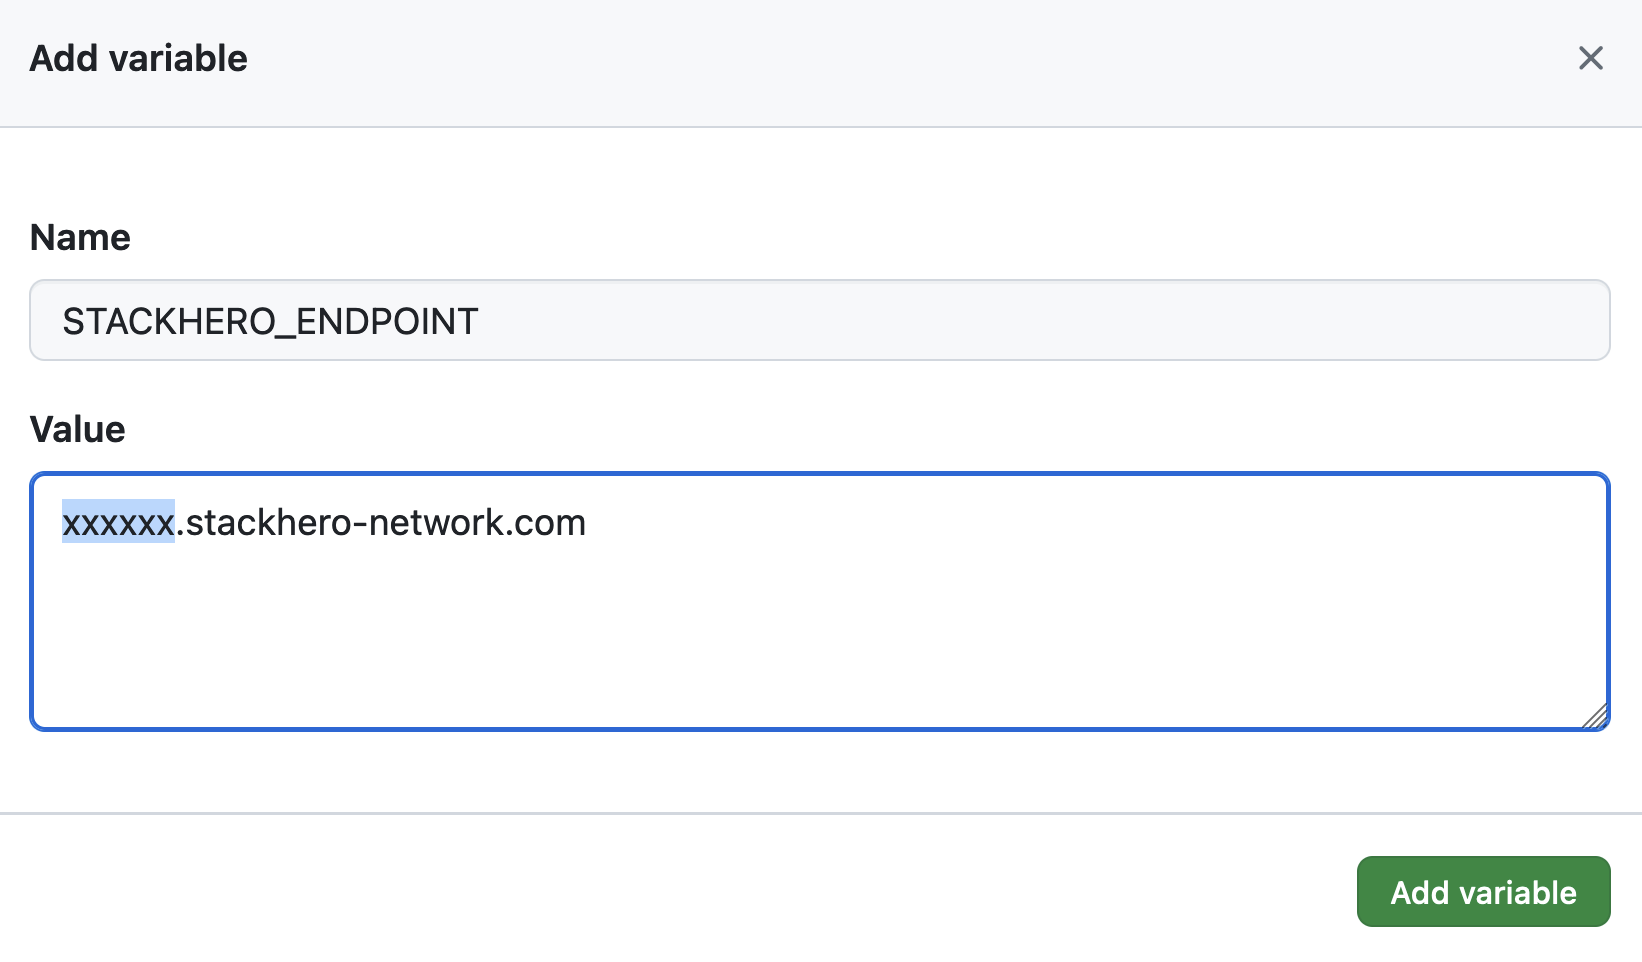 Setting the endpoint variable
If you have customized your service's domain name, use the customized version instead of <XXXXXX>.stackhero-network.com.
Delete the generated keys
For security reasons, it is recommended to delete the generated SSH keys from your computer after setup:
rm /tmp/ssh_key /tmp/ssh_key.pub
Configure the GitHub Actions workflow
Now you will create a GitHub Actions workflow file to automate your deployments. In your Git repository, create a folder named .github/workflows and add a file called deploy-to-stackhero.yml with the following content:
# File: .github/workflows/deploy-to-stackhero.yml

name: Deploy to Stackhero
run-name: Deploy branch "${{ github.ref_name }}" to Stackhero

on:
  push:
    # List of branches that will trigger the deploy action following a git push
    # Don't forget to create a corresponding environment in GitHub (under "Settings" -> "Environments") for each branch
    # Then add the secret "STACKHERO_SSH_PRIVATE_KEY" and variable "STACKHERO_ENDPOINT" in that environment
    branches: [ "production", "staging" ]

jobs:
  Deploy:
    environment: ${{ github.ref_name }}
    runs-on: ubuntu-latest
    steps:
    - uses: stackhero-io/github-actions-deploy-to-stackhero@v1
      with:
        # The secret "STACKHERO_SSH_PRIVATE_KEY" and the variable "STACKHERO_ENDPOINT" should be defined in the corresponding GitHub environment (under "Settings" -> "Environments")
        ssh_private_key: ${{ secrets.STACKHERO_SSH_PRIVATE_KEY }}
        endpoint: ${{ vars.STACKHERO_ENDPOINT }}
Once you have added this file, you can commit your changes with the following commands in your terminal:
git add -A .
git commit -m "Add GitHub Actions to deploy to Stackhero"
To create the production branch, you can run:
git checkout -b production
Then push your changes to GitHub:
git push --set-upstream origin production
This will push your code to the production branch on GitHub. GitHub Actions will then automatically run and deploy your code to the associated Stackhero instance. To check the deployment status, go to your GitHub project and click on Actions.
 GitHub Actions that deployed to production
Congratulations! Your project is now set up for automatic deployment to production using GitHub Actions.
Creating the staging environment
You can set up your staging environment in the same way as the production environment. Just repeat the steps above, replacing production with staging where appropriate.
Once the settings are configured, create your staging branch as follows:
git checkout -b staging
Then push it to GitHub:
git push --set-upstream origin staging
GitHub Actions will automatically deploy the code from your staging branch to the PHP service you have set up for staging.
Going further
To ensure your application remains reliable and secure, it is recommended to protect your production and staging branches against direct pushes. For example, you can require that changes go through pull requests, with the staging branch being reviewed and merged only by those authorized to deploy. Once your changes are validated in staging, authorized users can merge them into the production branch.
This approach ensures that only validated code reaches production, while allowing you to test new features in staging before they go live, giving you and your team extra peace of mind.