 Docker: Deploy with GitHub Actions
Learn how to deploy your Docker containers using GitHub Actions
👋 Welcome to the Stackhero documentation!
Stackhero offers a ready-to-use Docker cloud CaaS (Containers as a Service) solution that provides a host of benefits, including:
- Easily deploy your containers to production with just a
docker-compose up.- Customizable domain name secured with HTTPS (for example, https://api.your-company.com, https://www.your-company.com, https://backoffice.your-company.com).
- Optimal performance and robust security powered by a private and dedicated VM.
- Effortless updates with just a click.
Save time and simplify your life: it only takes 5 minutes to try Stackhero's Docker CaaS cloud hosting solution and deploy your containers to production!
GitHub Actions makes it easy to automate tasks such as deploying your Docker containers to your production servers. In this guide, you will learn how to configure GitHub Actions securely and reliably to deploy your Docker containers to both staging and production environments.
For this setup, you will maintain two branches: staging and production. Each time you push code to one of these branches, it will automatically be deployed to the corresponding Stackhero instance.
Having a staging instance is not mandatory. You can follow this guide using only a production instance. However, to minimize risks and deploy to production with confidence, it is strongly recommended to have both a staging and a production instance. This is an industry standard and best practice that helps avoid many potential issues.
Before you begin, make sure you have a GitHub account and a repository hosting your code.
Creating the Docker services
Start by logging in to your Stackhero dashboard and creating two Stackhero services, one for staging and one for production. To stay organized and reduce the risk of errors, you may want to rename these services to "Staging" and "Production".
Don't have a Stackhero account yet? You can create one for free in just two minutes, then deploy your Docker cloud services with just a few clicks.
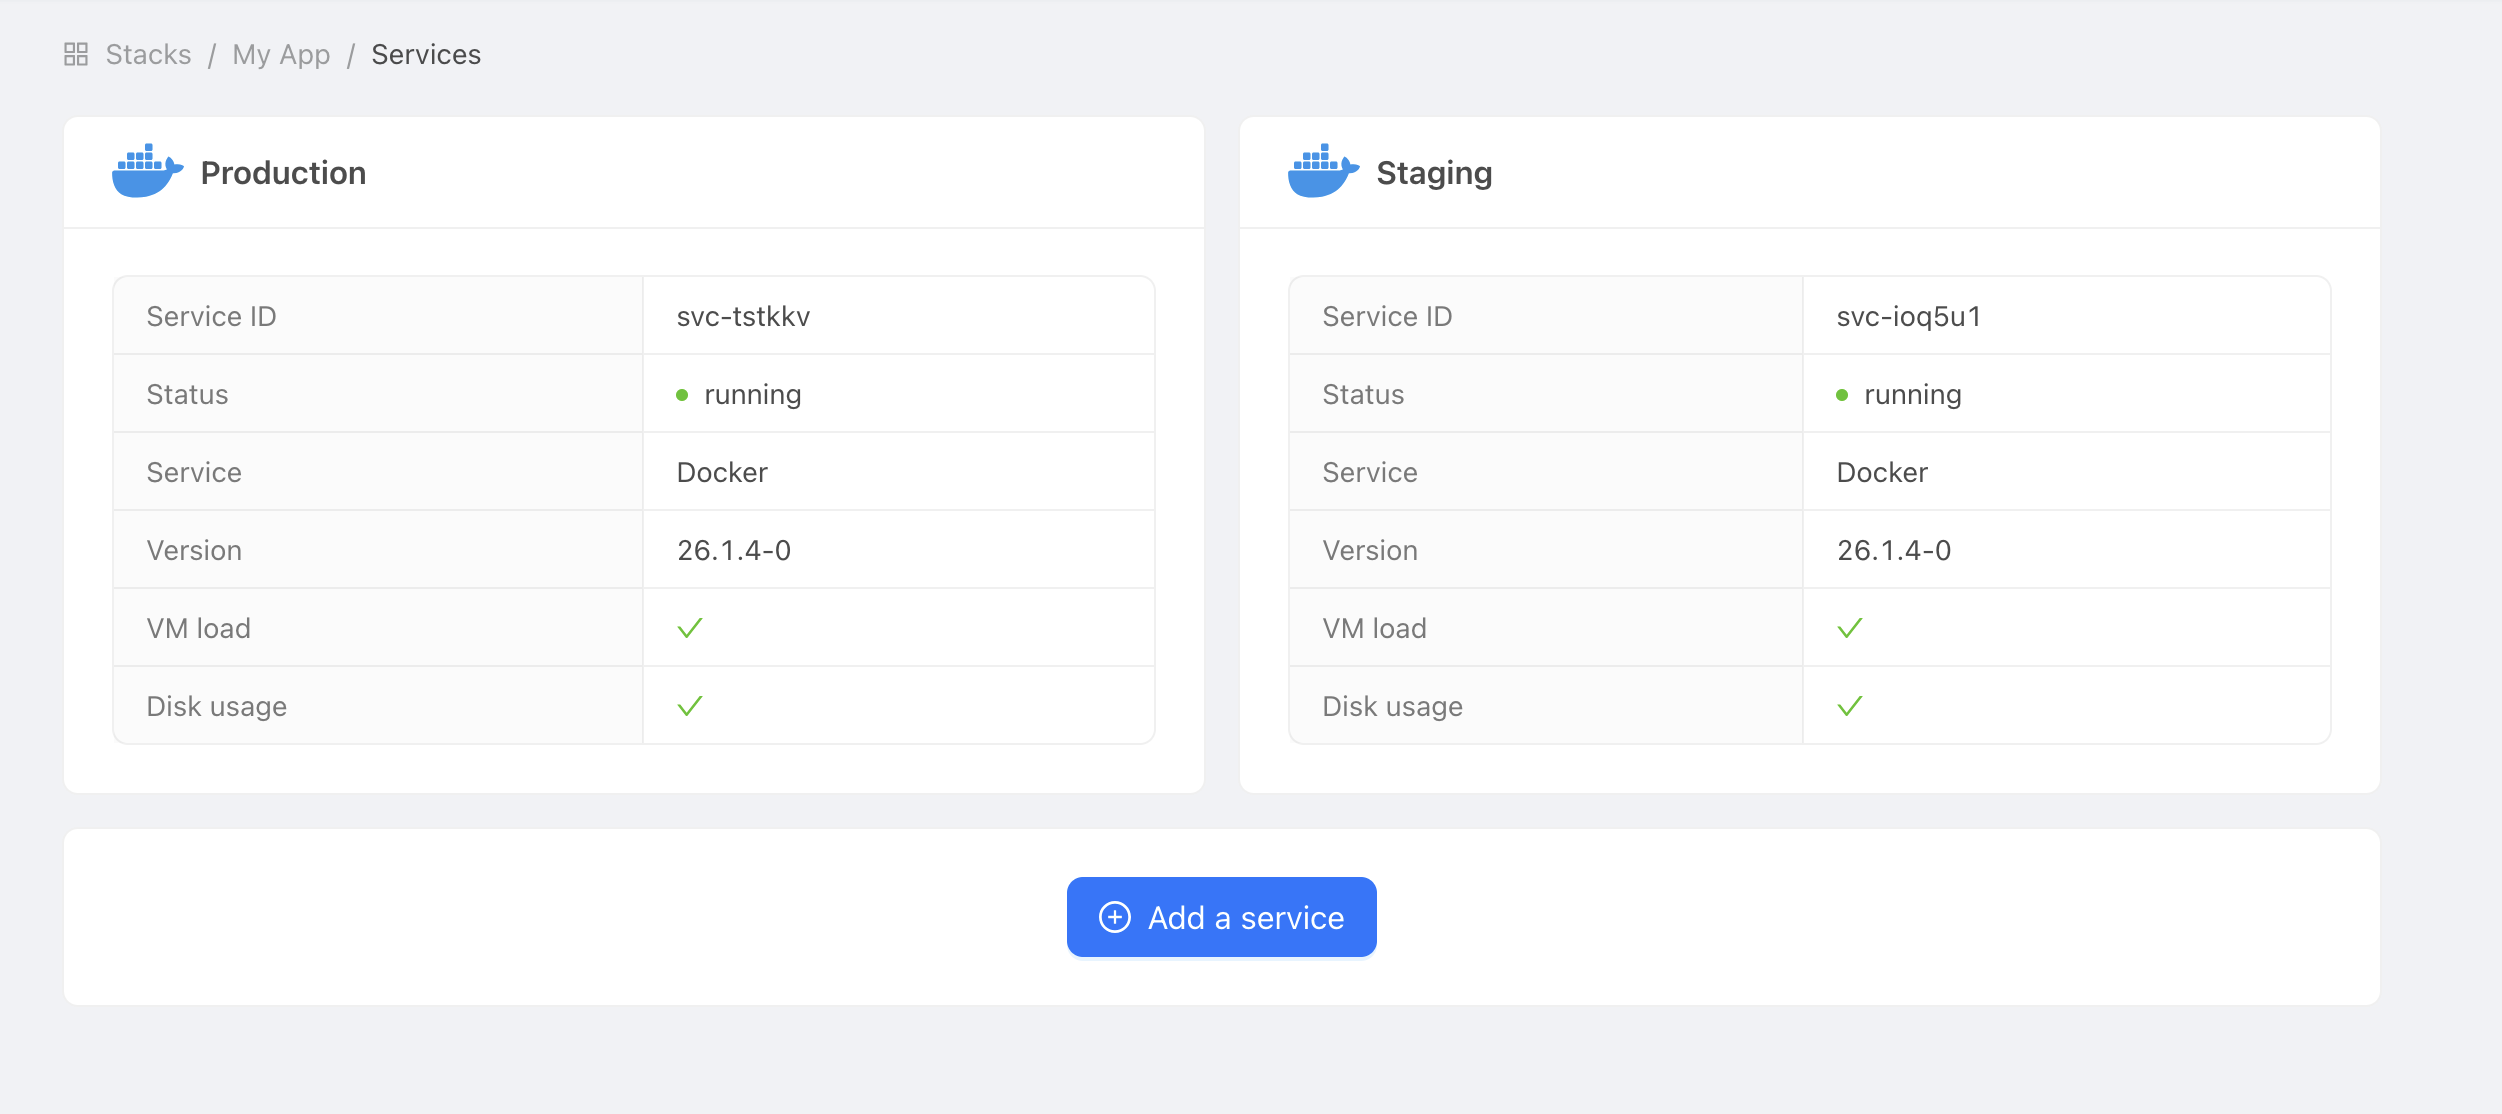 Example of Docker services
Configure the environment variables and secrets
Get the domain name and certificates password
To allow GitHub Actions to connect to your Stackhero Docker service, you will need two pieces of information: your service's domain name and the certificates password.
-
In the Stackhero dashboard, select your "production" Docker service and click the "Configure" button.
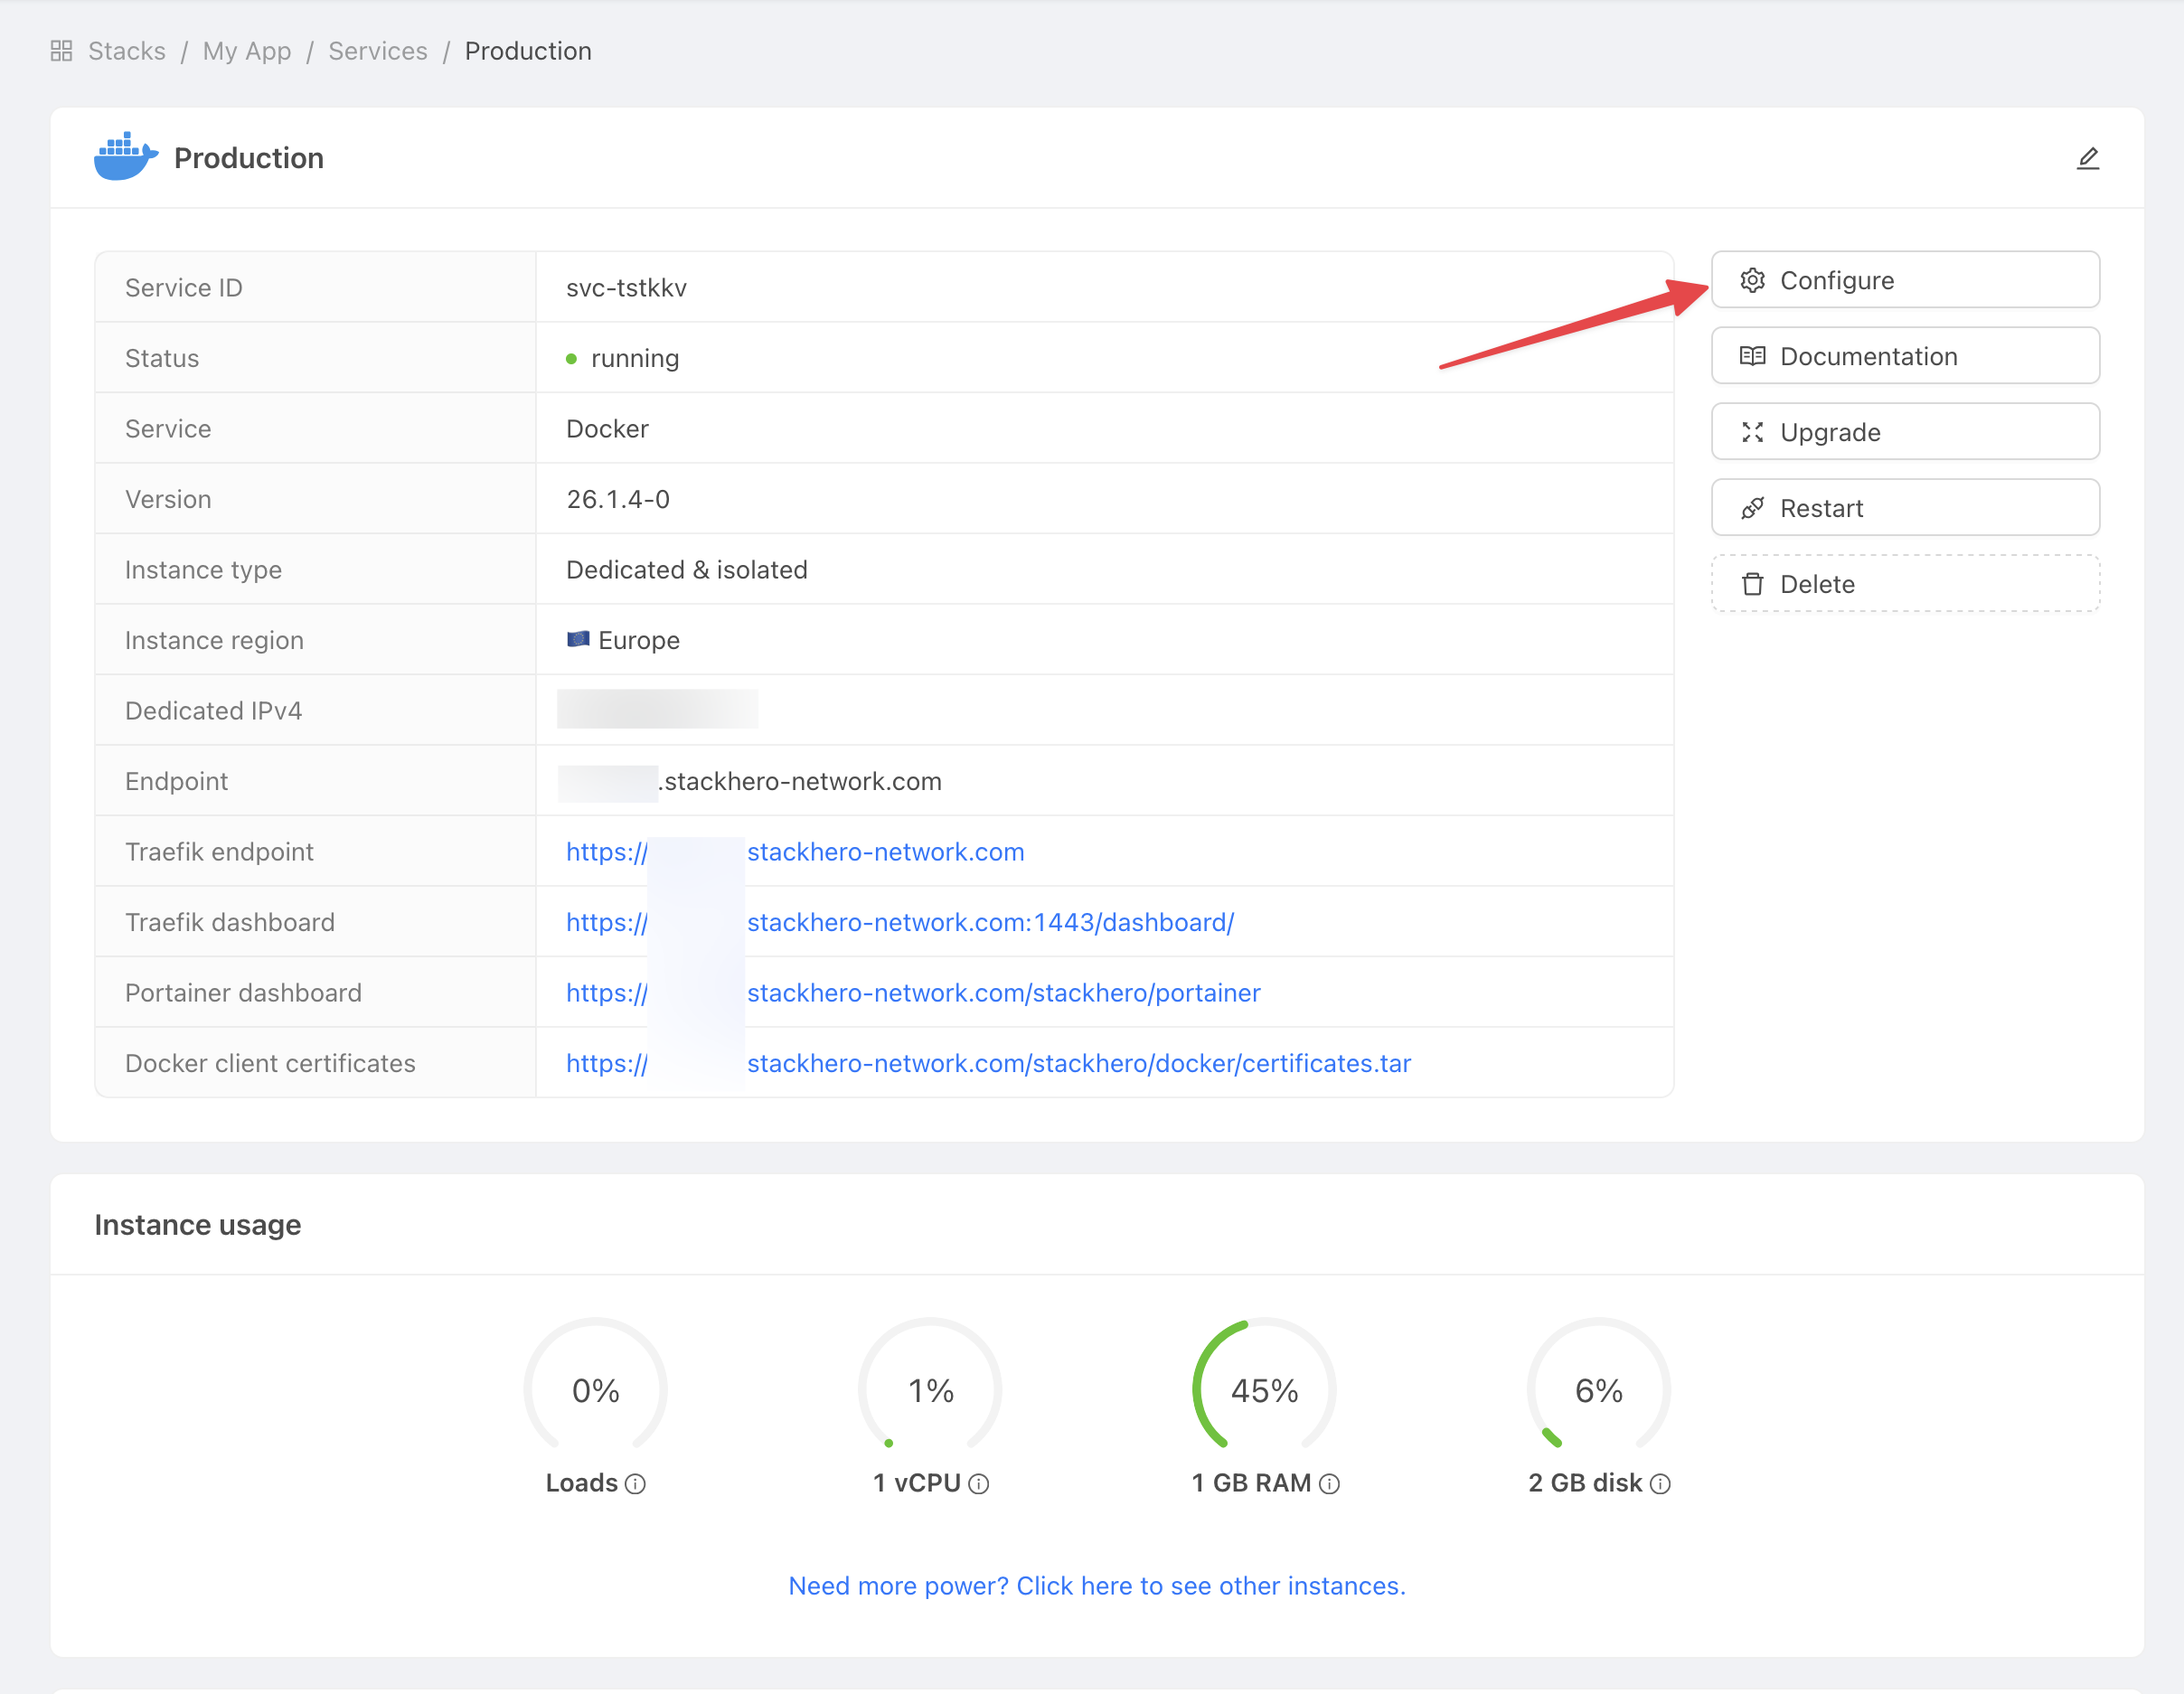 Get service settings
 -
Copy both the "Domain name" and the "Docker certificates password" for use in the next steps.
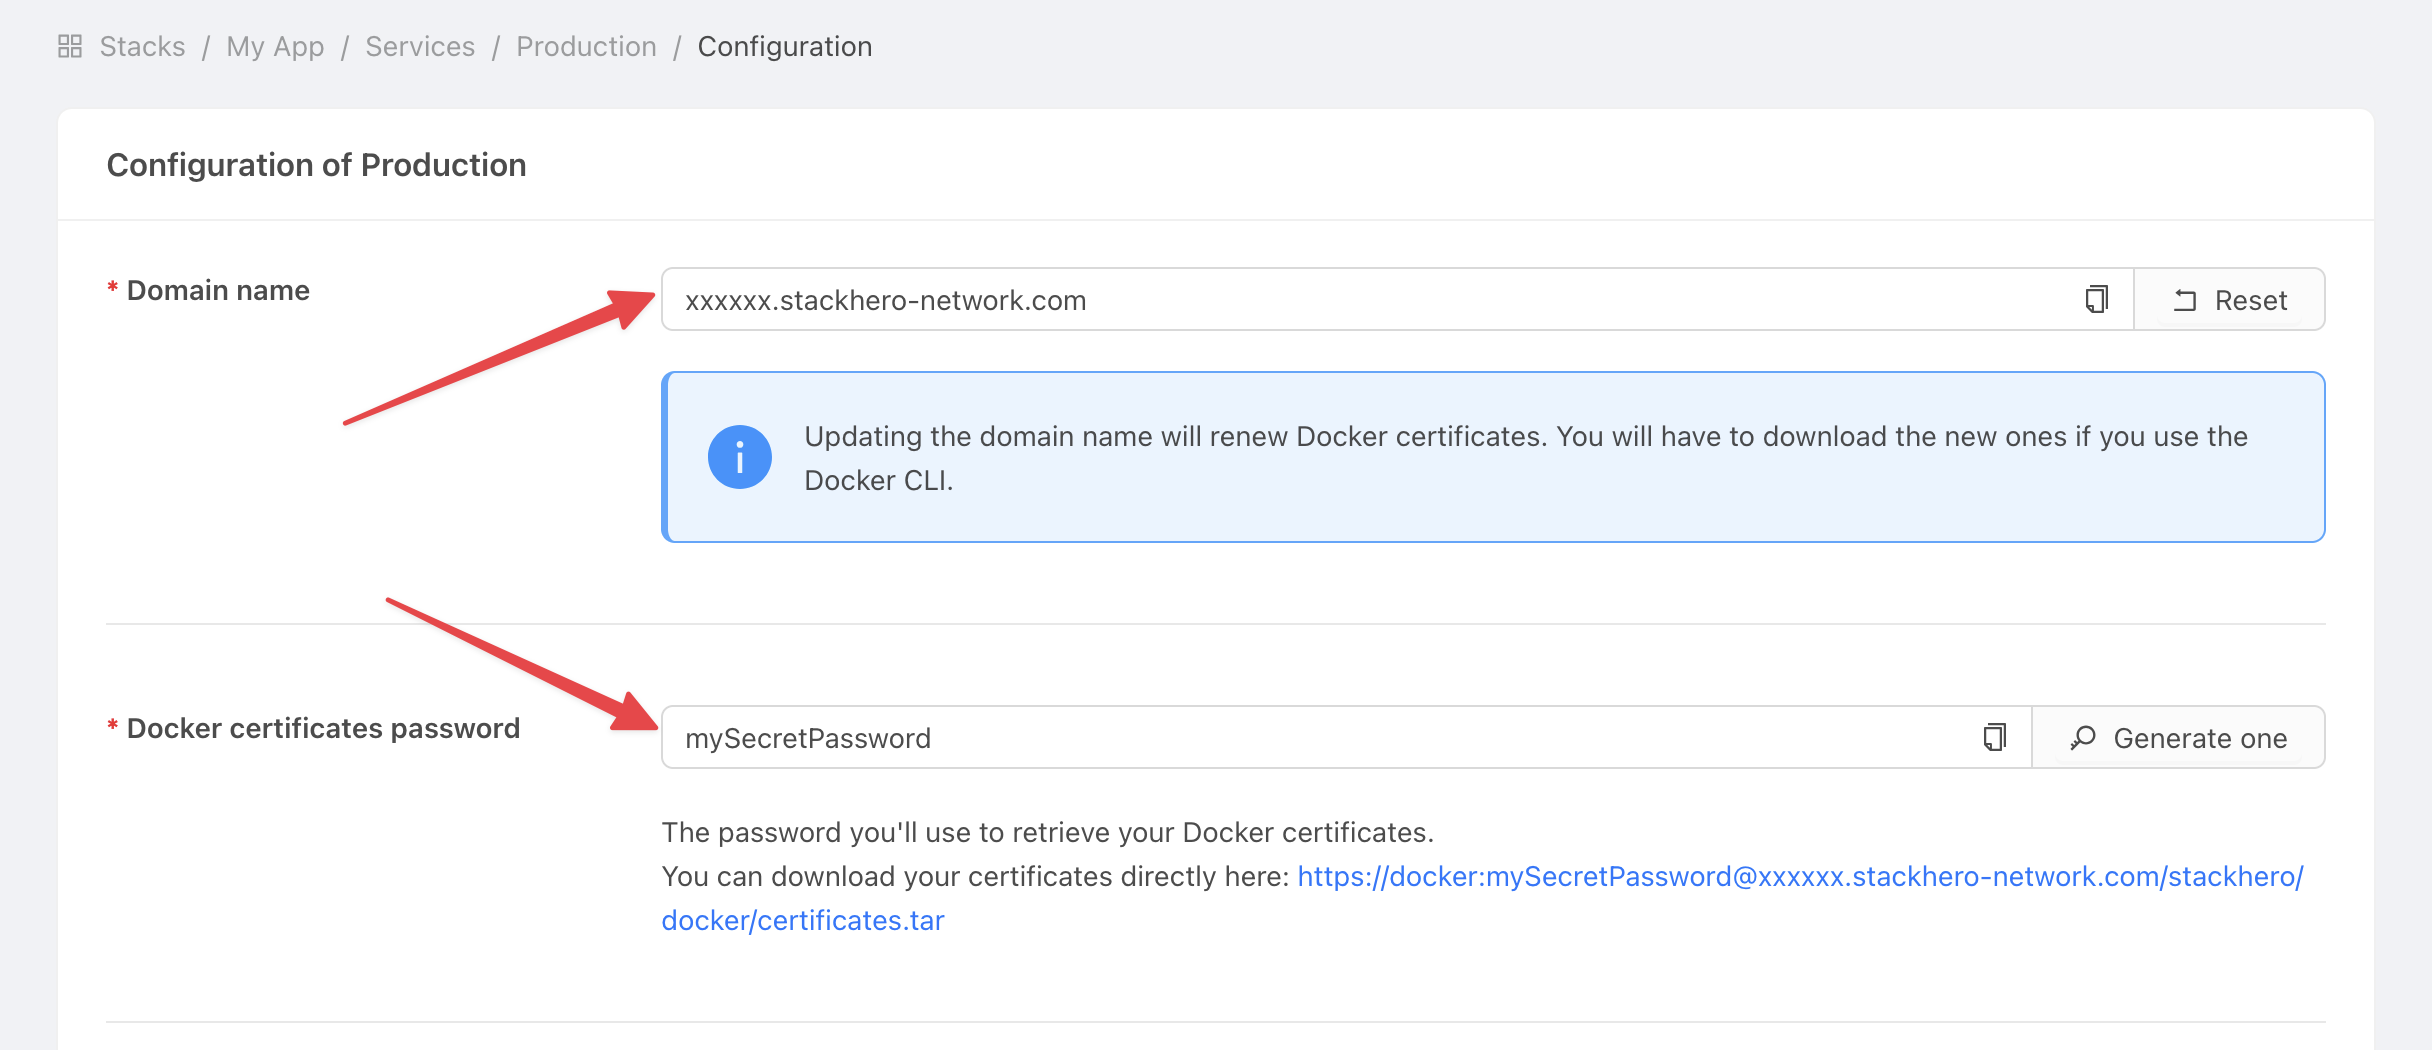 Get service settings
Set the domain name and certificates password in GitHub
-
In GitHub, open your project.
-
Go to Settings > Environments, then click New environment.
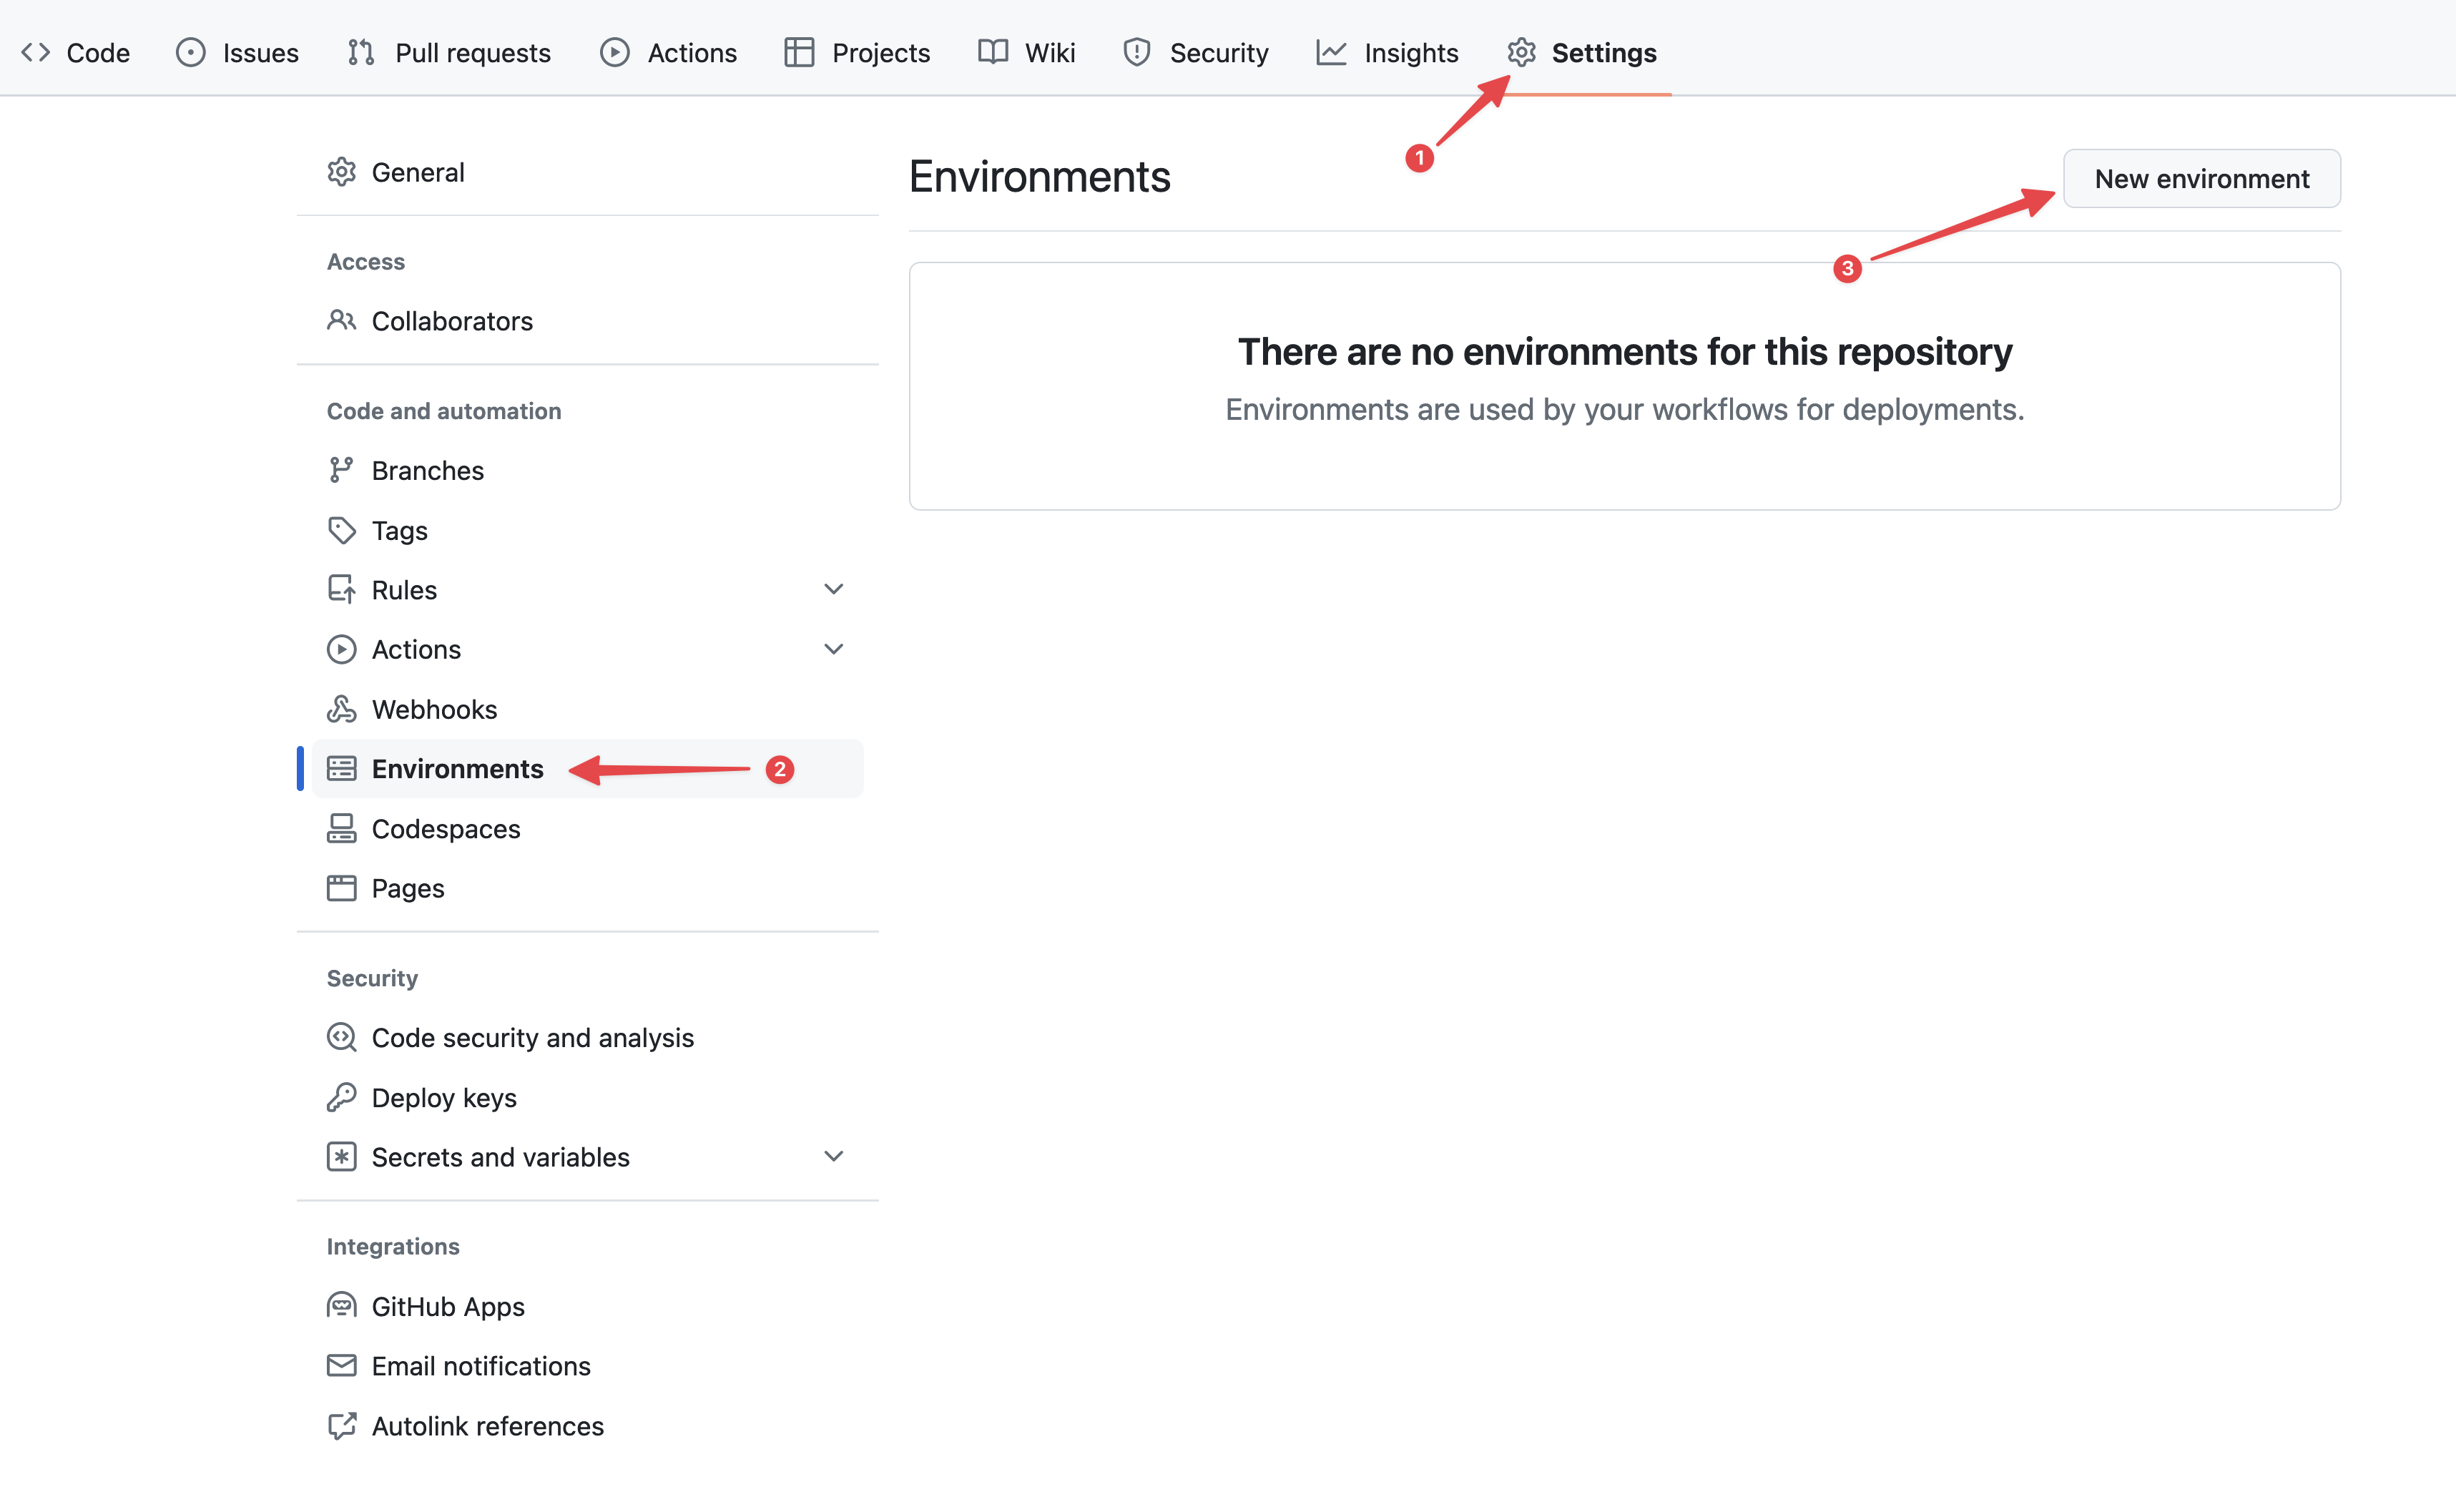 Configuring GitHub environments
 -
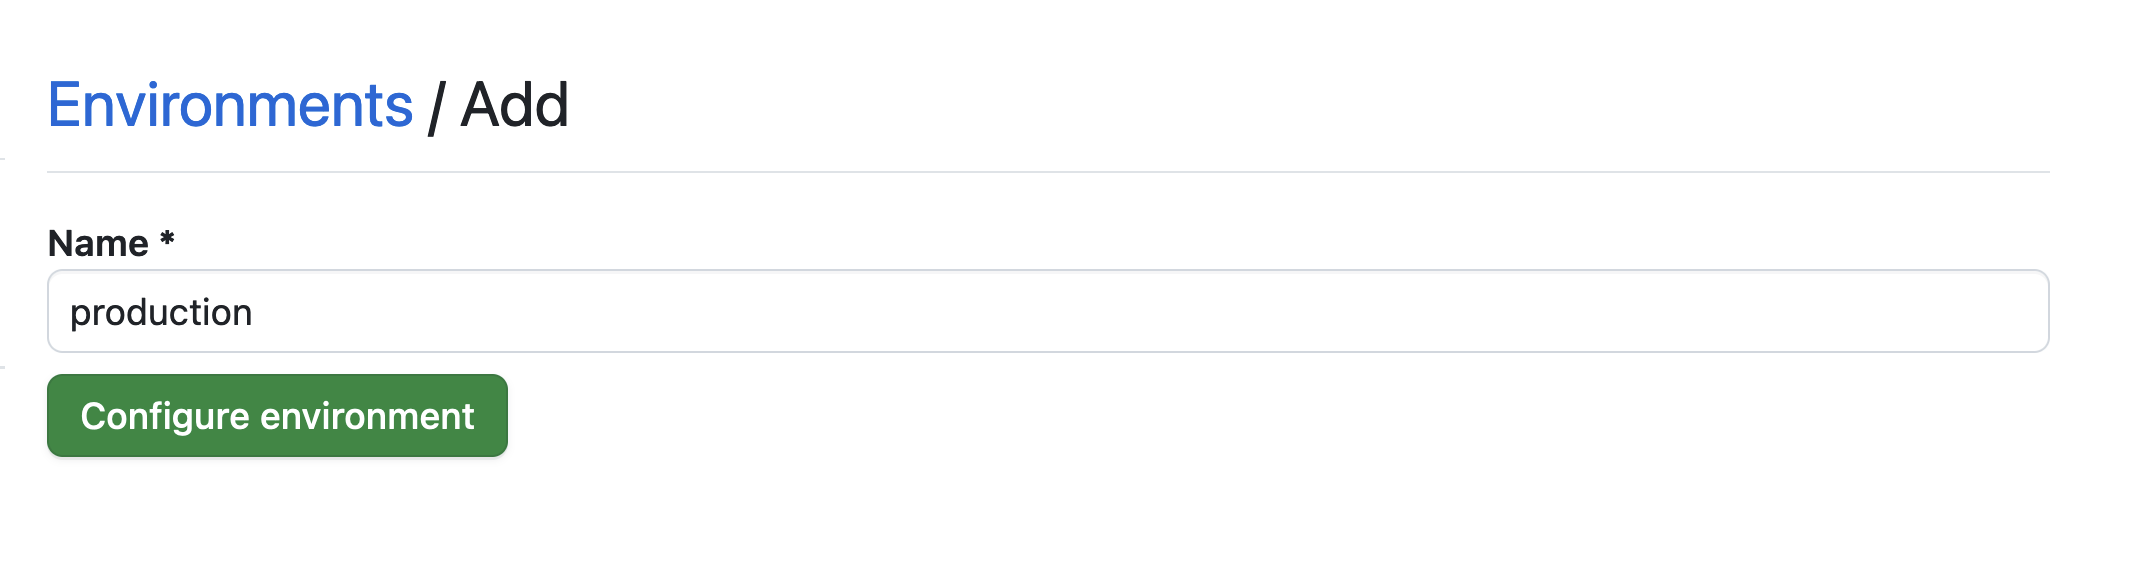
In the Name field, enter "production" and confirm.
 Setting the environment
 -
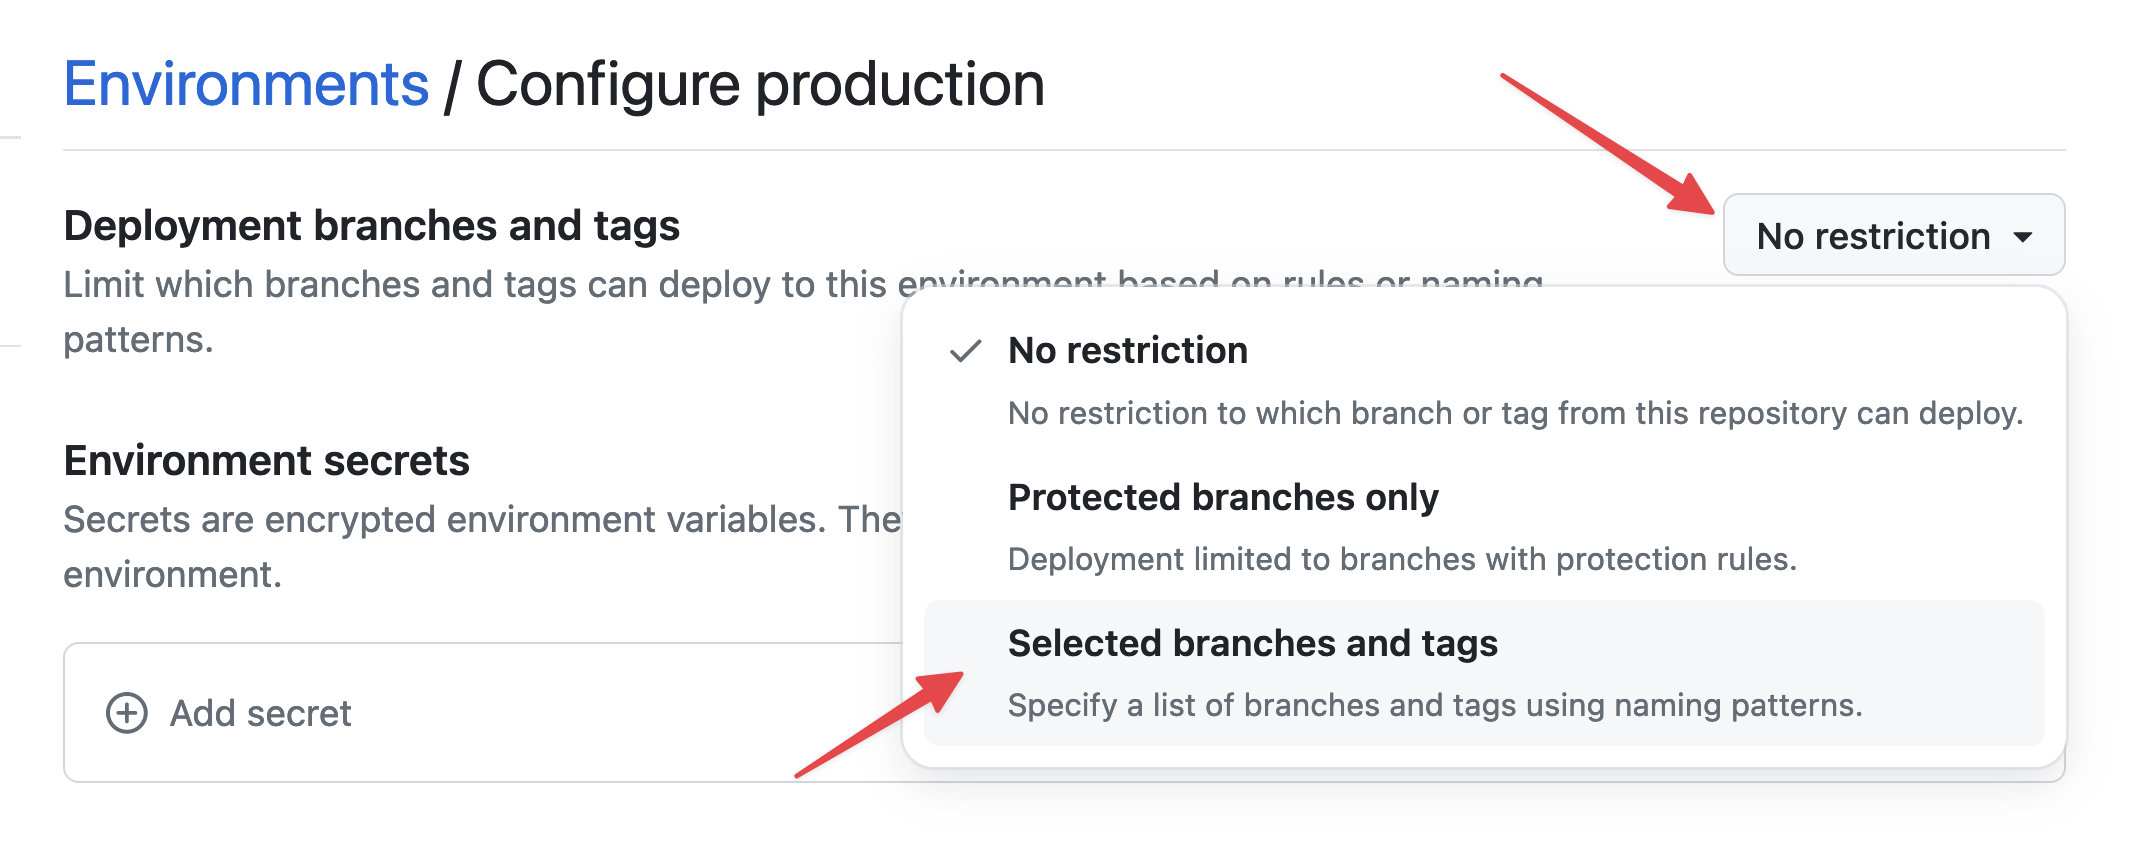
Click the No restriction button and select Selected branches and tags.
 Setting environment restrictions
 -
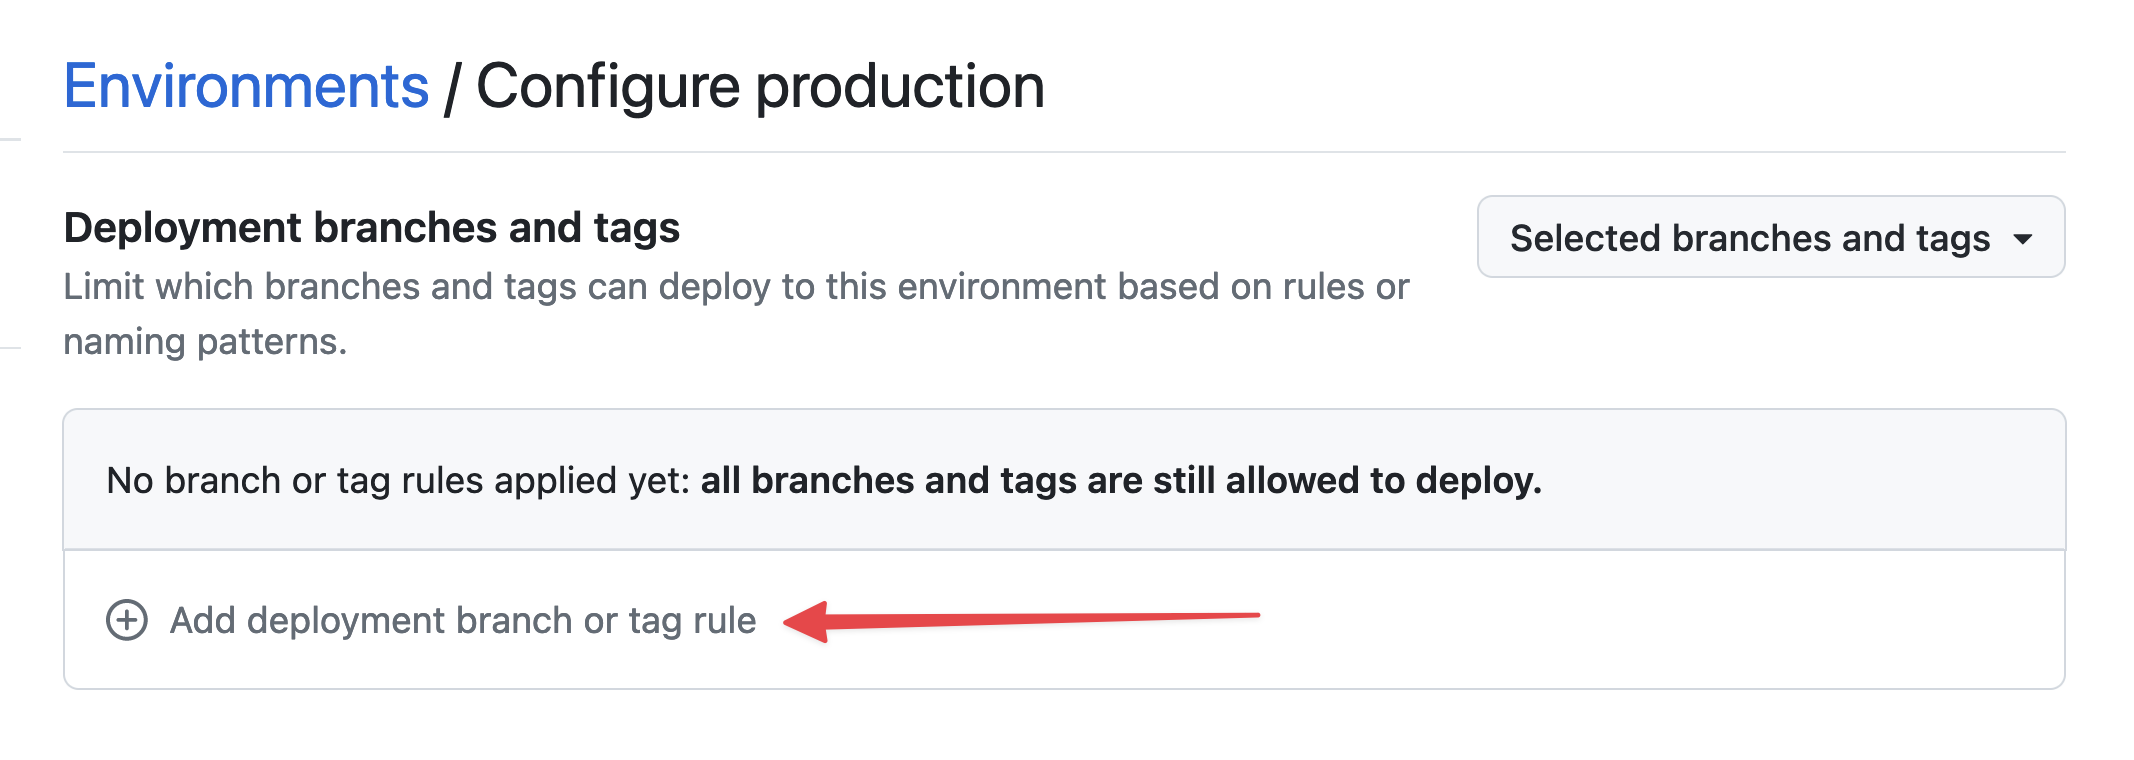
Click Add deployment branch or tag rule, enter "production" in the Name pattern field, then click Add rule.
 Setting environment branch
 Setting environment branch
 -
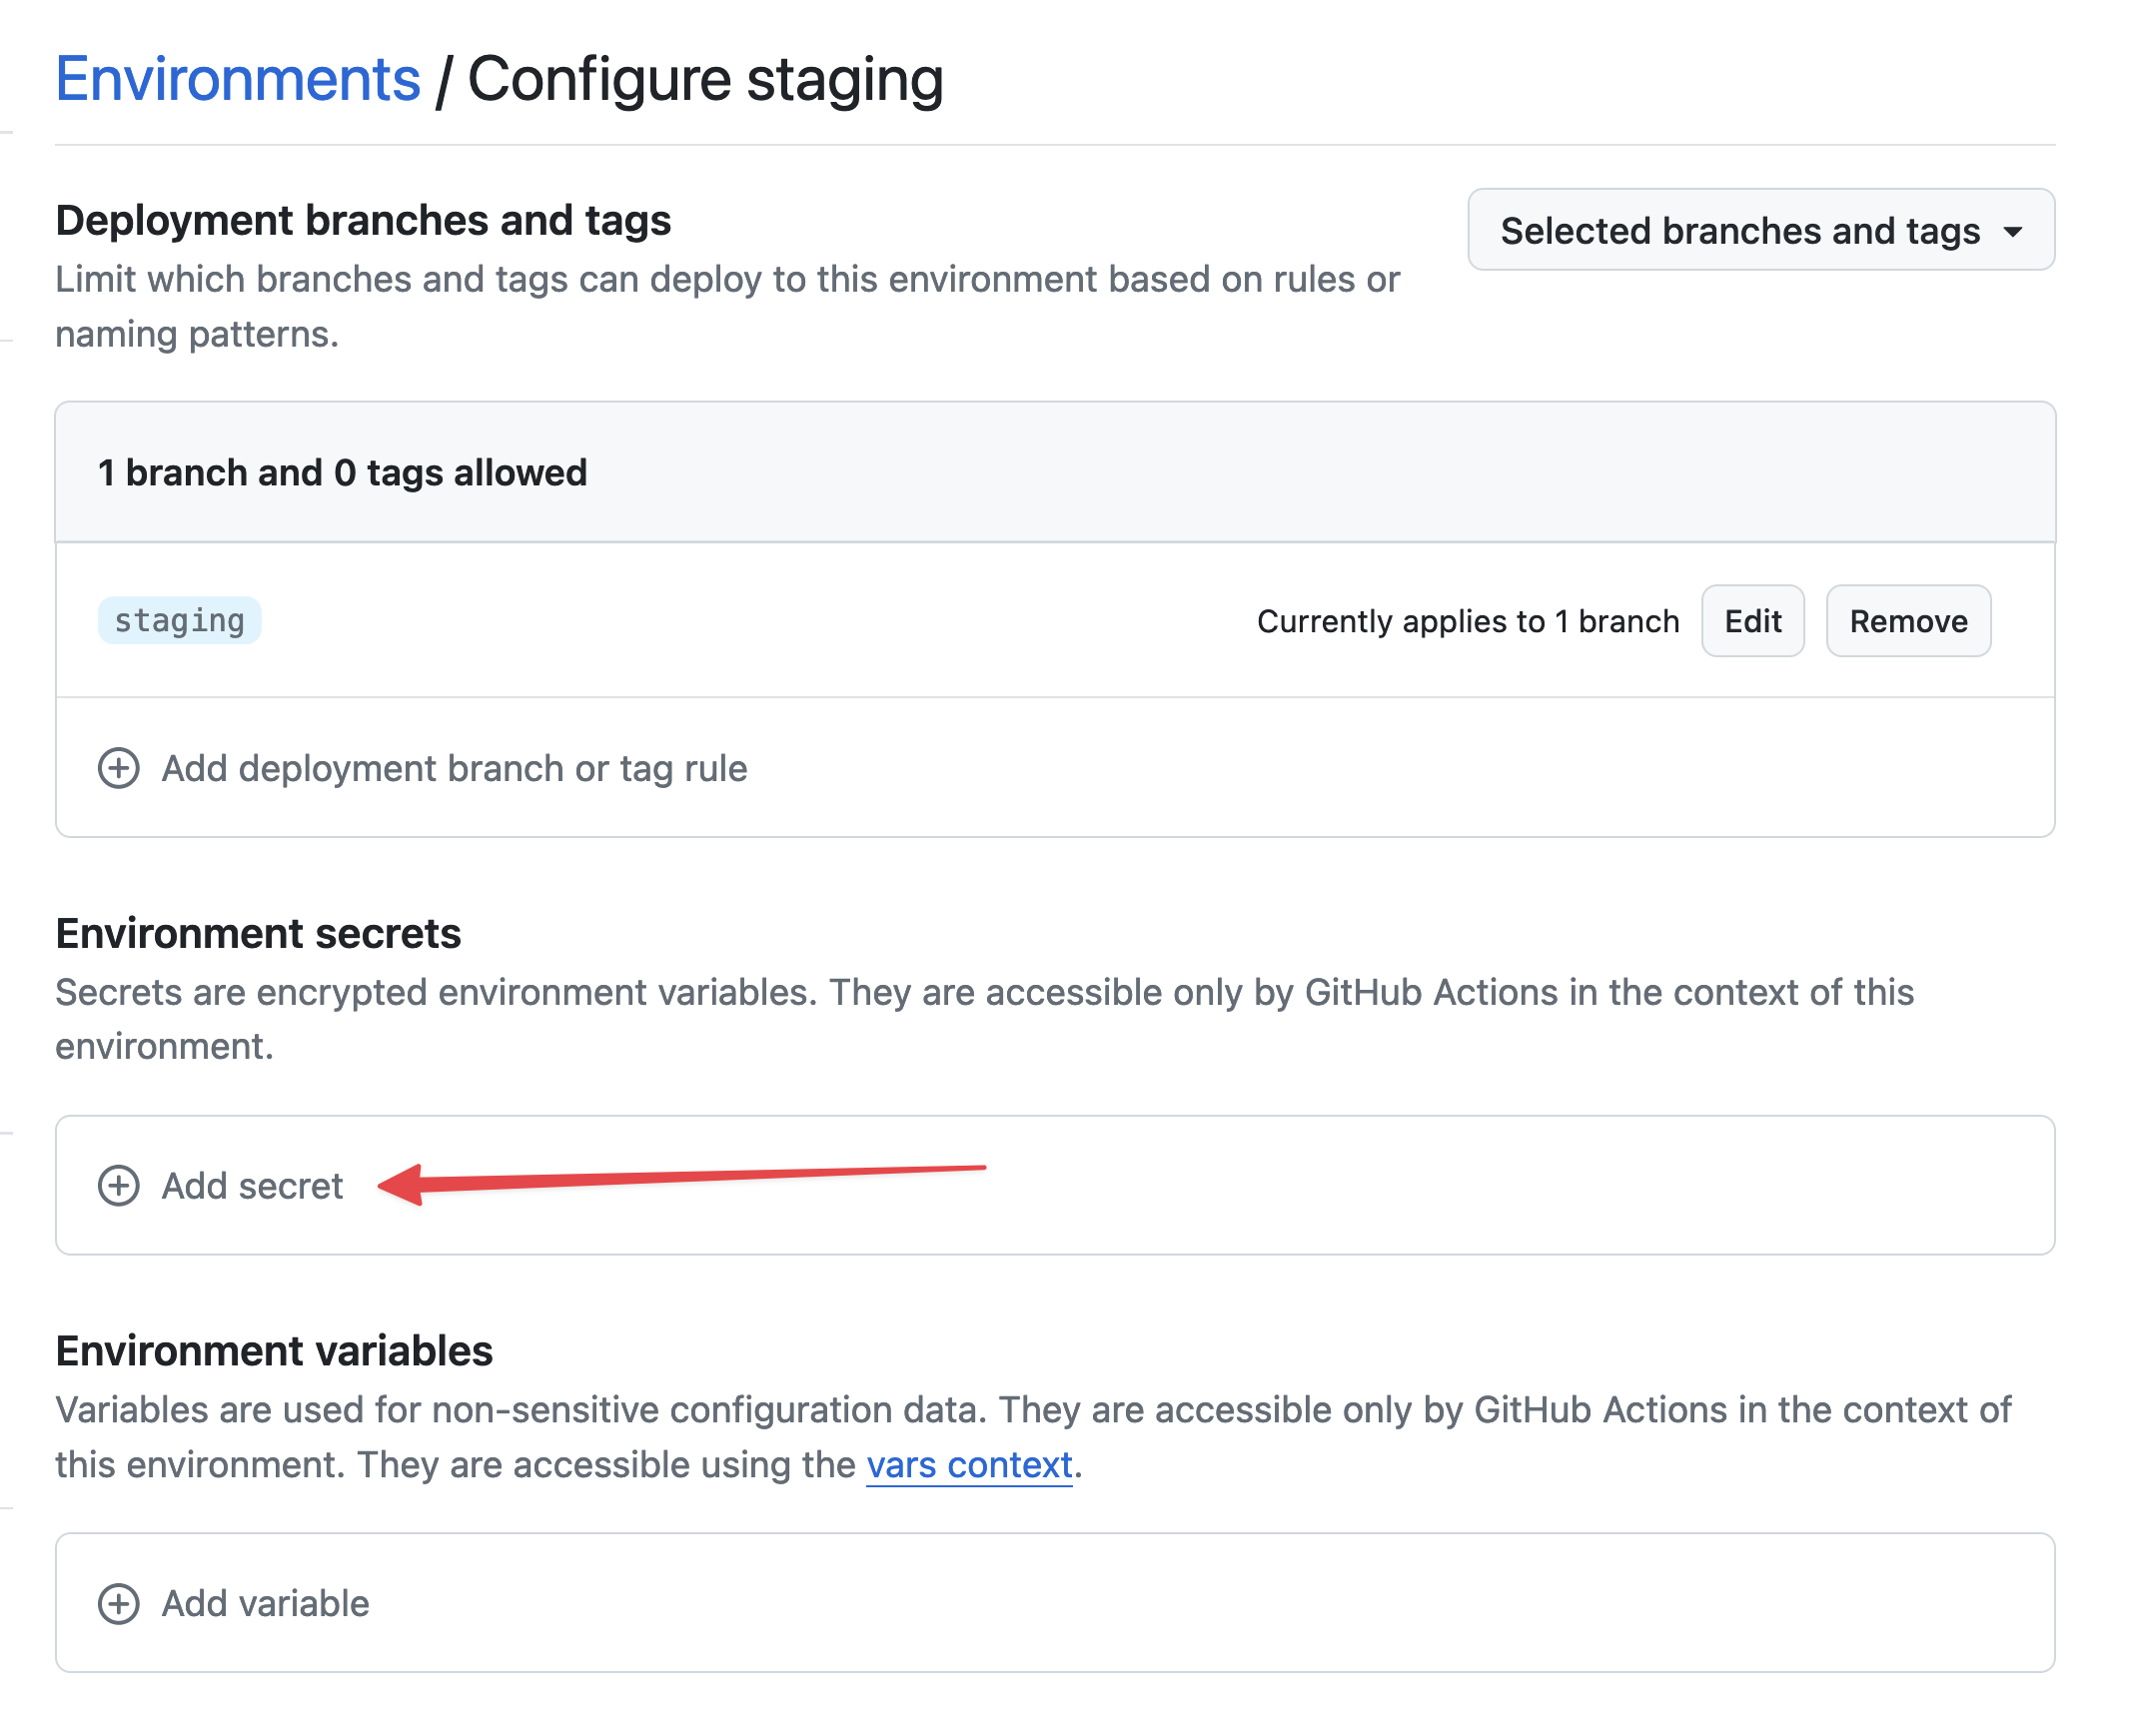
Under Environment secrets, click Add secret.
 Add secret
 -
For the secret, use
STACKHERO_CERTIFICATES_PASSWORDas the name and paste your certificates password into the Value field.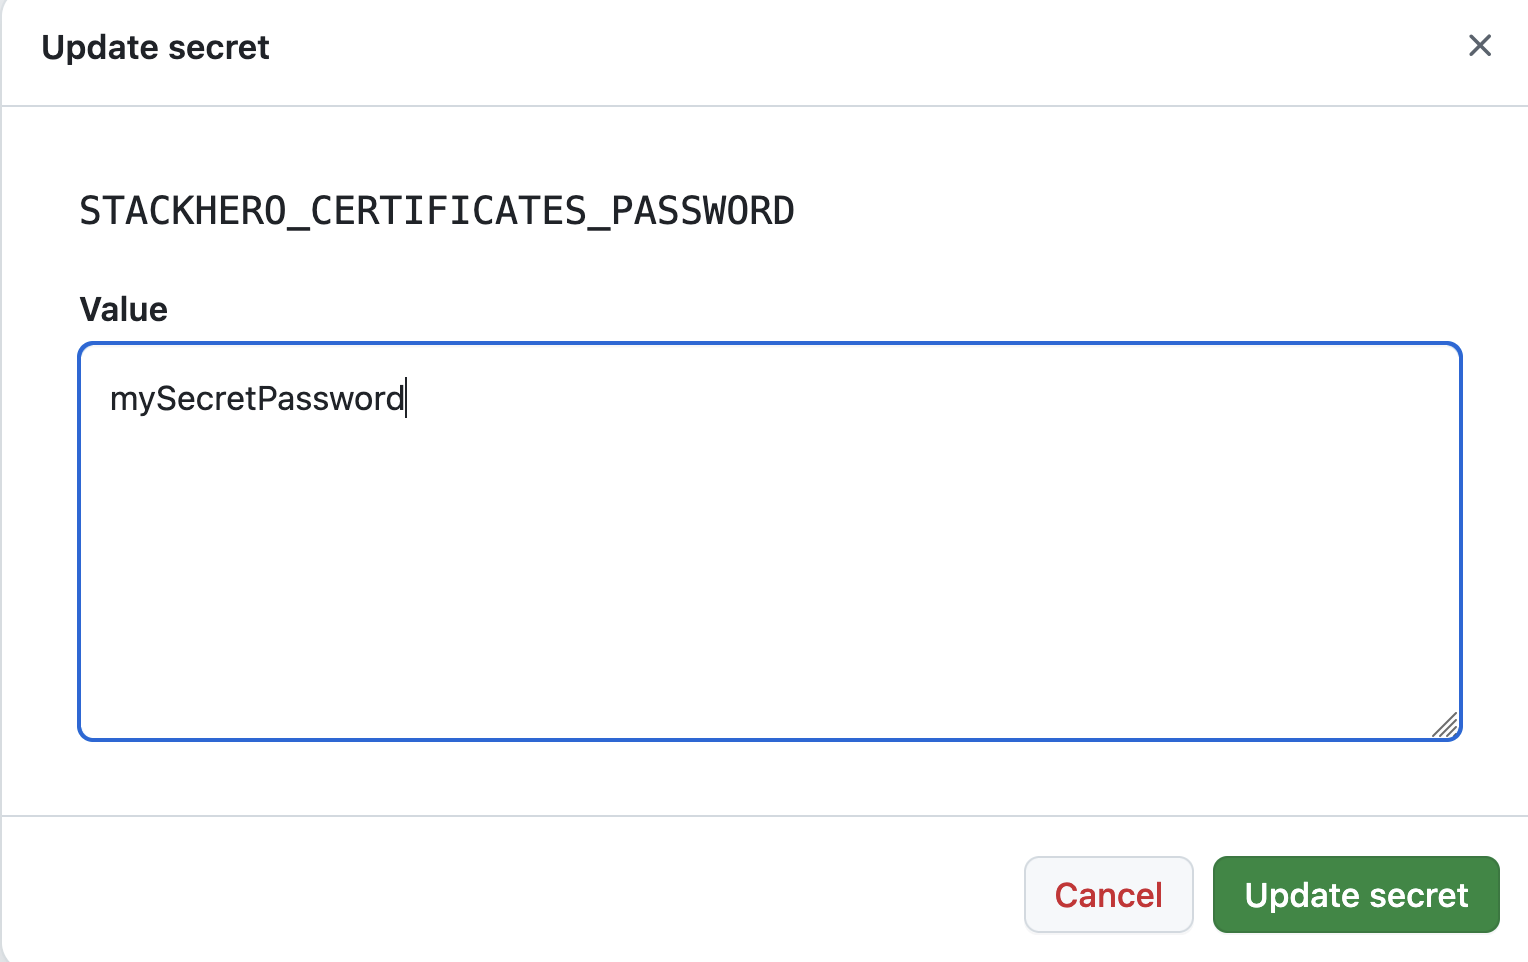 Setting the certificates password secret
 -
Under Environment variables, click Add variable.
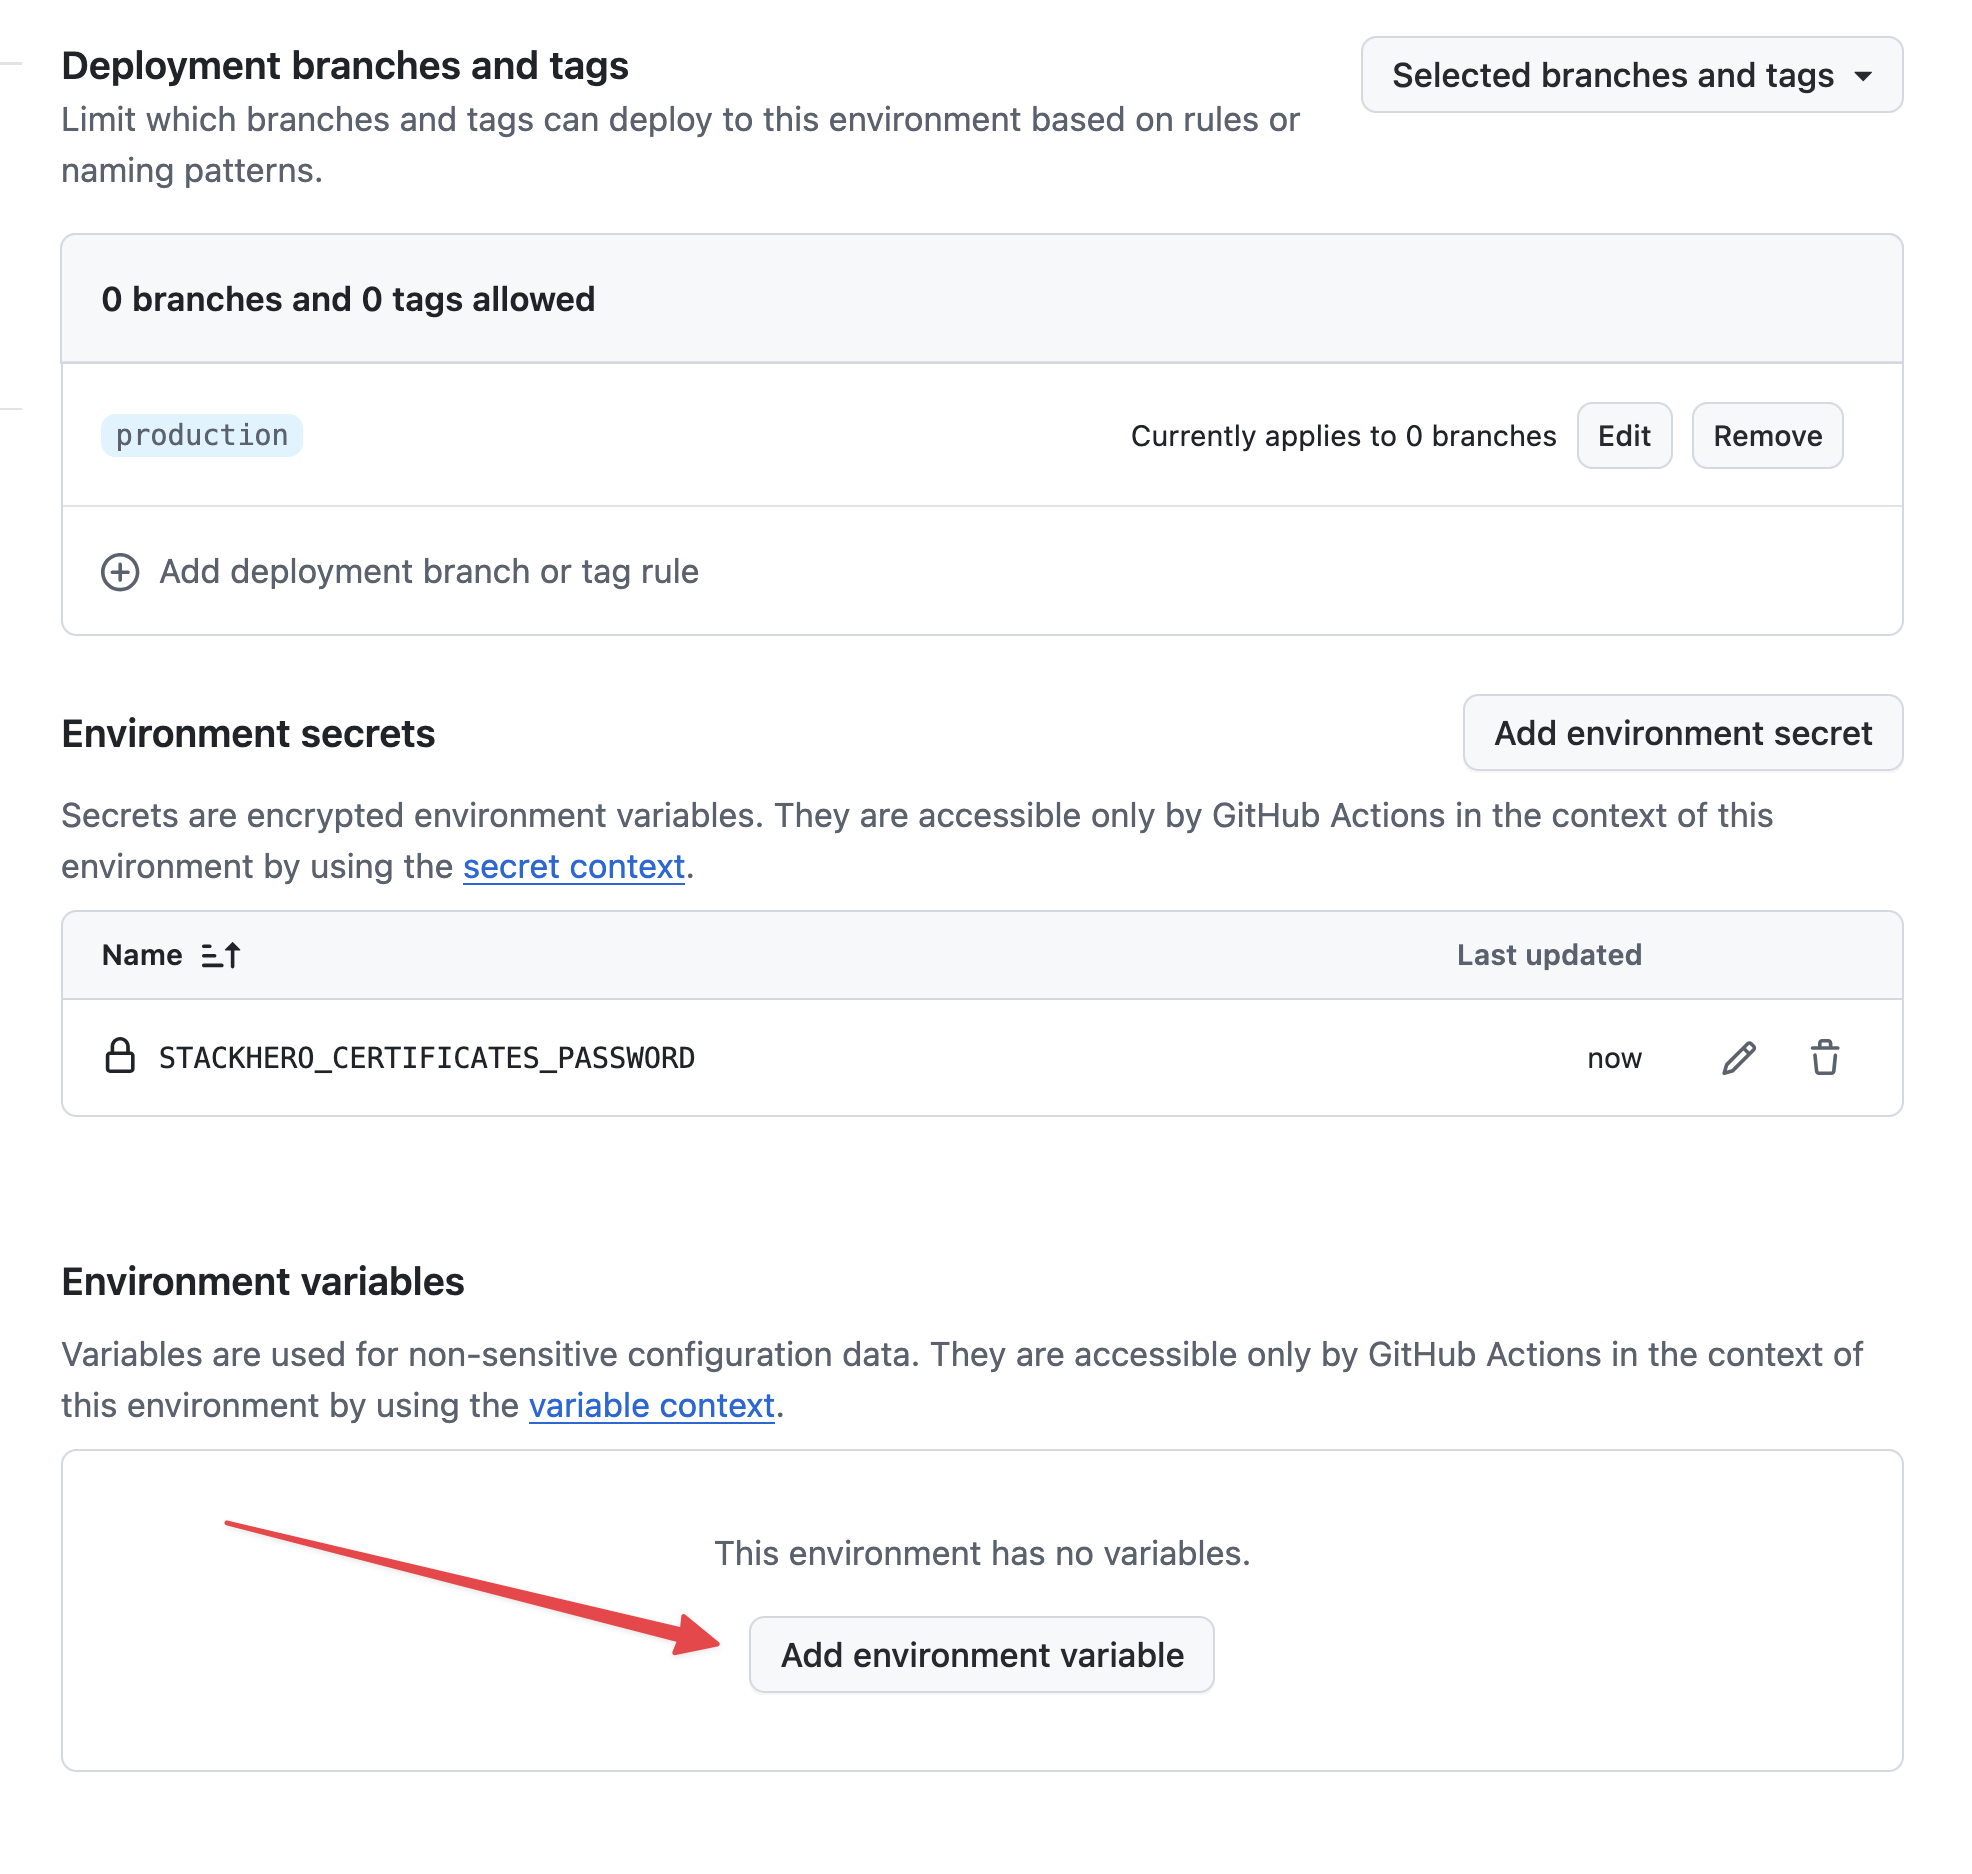 Setting variables
 -
Use
STACKHERO_ENDPOINTas the name and paste your Docker service endpoint into the Value field. You can find this endpoint in your Stackhero dashboard.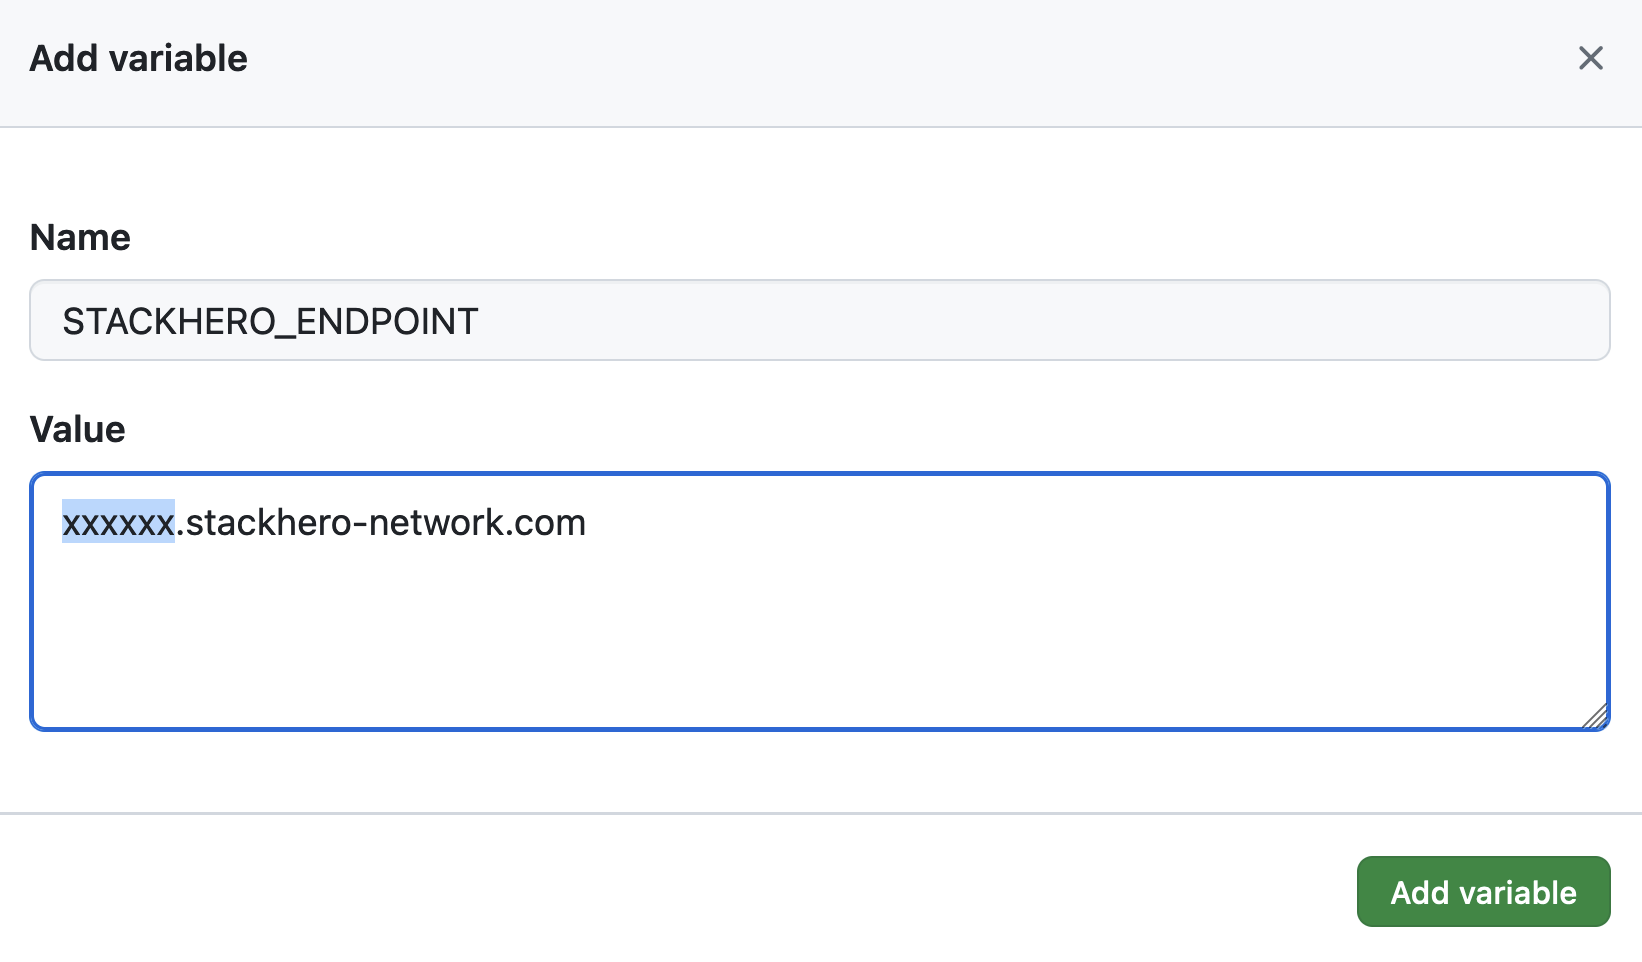 Setting the endpoint variable
If you have customized your service's domain name, make sure to use your custom domain instead of <XXXXXX>.stackhero-network.com.
Customize the Docker Compose configuration file
If the
docker-compose.ymlfile is already at the root of your project and you do not need any customizations, you can skip this section.
By default, GitHub Actions looks for the docker-compose.yml file at the root of your project. If you want to use a different file or configuration, you can adjust the deployment command. For example, if you are using our Node.js and Docker getting started boilerplate, you can create a new environment variable called STACKHERO_DEPLOY_COMMAND and set it as follows:
docker compose --env-file env.list --file docker/docker-compose.yml --file docker/docker-compose.production.yml up --build --remove-orphans -d
Configure the GitHub Actions workflow
On your local machine, go to your Git repository and create a directory named .github/workflows. In this directory, create a file called deploy-to-stackhero.yml with the following content:
# File: .github/workflows/deploy-to-stackhero.yml

name: Deploy to Stackhero
description: Deploy branch "${{ github.ref_name }}" to Stackhero

on:
  push:
    # These branches trigger the deploy action on push.
    # Be sure to create an environment matching the branch name in GitHub (under Settings > Environments).
    # Then add the secret STACKHERO_CERTIFICATES_PASSWORD and variable STACKHERO_ENDPOINT in that environment.
    branches: [ "production", "staging" ]

jobs:
  Deploy:
    environment: ${{ github.ref_name }}
    runs-on: ubuntu-latest
    steps:
    - uses: stackhero-io/github-actions-deploy-docker-containers-to-stackhero@v1
      with:
        # The secret STACKHERO_CERTIFICATES_PASSWORD and the variable STACKHERO_ENDPOINT should be defined in the corresponding branch environment on GitHub.
        certificates_password: ${{ secrets.STACKHERO_CERTIFICATES_PASSWORD }}
        endpoint: ${{ vars.STACKHERO_ENDPOINT }}
        # deployment_command is optional. You can use it if you need to customize the Docker Compose command.
        deployment_command: ${{ vars.STACKHERO_DEPLOY_COMMAND }}
You can commit your changes with:
git add -A .
git commit -m "Add GitHub Actions to deploy to Stackhero"
To create a production branch, run:
git checkout -b production
Then push your production branch to GitHub:
git push --set-upstream origin production
Once your code is pushed, GitHub Actions will automatically deploy it to your production Stackhero instance. You can monitor the deployment progress in the Actions tab of your GitHub project.
 GitHub Actions that deployed to production
That's it. Your setup is now ready to automatically deploy your code to production using GitHub Actions.
Creating the staging environment
Setting up the staging environment follows the same steps as for production. Simply repeat the process, using staging instead of production.
Next, create a staging branch by running:
git checkout -b staging
And push your staging branch to GitHub:
git push --set-upstream origin staging
After this, GitHub Actions will automatically deploy your staging branch to the dedicated Docker instance for staging.
Using environment variables in docker-compose.yml
You can define environment variables in your GitHub project that will be accessible in your docker-compose.yml file. This is very useful if you want to deploy to different domains (for example, staging.my-company.com for staging and my-company.com for production).
- In GitHub, go to Settings > Environments and create an environment variable named
WEBSITE_DOMAIN. - For the staging environment, set
WEBSITE_DOMAINto "staging.my-company.com". - For the production environment, set
WEBSITE_DOMAINto "my-company.com".
Next, update your .github/workflows/deploy-to-stackhero.yml file to pass the WEBSITE_DOMAIN variable to the Stackhero GitHub Action:
name: Deploy to Stackhero
description: Deploy branch "${{ github.ref_name }}" to Stackhero

on:
  push:
    branches: [ "production", "staging" ]

jobs:
  Deploy:
    environment: ${{ github.ref_name }}
    runs-on: ubuntu-latest
    steps:
    - uses: stackhero-io/github-actions-deploy-docker-containers-to-stackhero@v1
      with:
        certificates_password: ${{ secrets.STACKHERO_CERTIFICATES_PASSWORD }}
        endpoint: ${{ vars.STACKHERO_ENDPOINT }}
        deployment_command: ${{ vars.STACKHERO_DEPLOY_COMMAND }}
      env:
        WEBSITE_DOMAIN: ${{ vars.WEBSITE_DOMAIN }}
Then update your docker-compose.yml file to use the WEBSITE_DOMAIN variable instead of a hard-coded domain name:
services:
  test:
    image: nginx
    labels:
      - "traefik.enable=true"
      - "traefik.http.routers.test.rule=Host(`${WEBSITE_DOMAIN}`)" # Uses the WEBSITE_DOMAIN environment variable as the domain name.
      - "traefik.http.routers.test.tls.certresolver=letsencrypt"
Going further
It is recommended to protect the production and staging branches to prevent direct pushes. With branch protection enabled, changes are made through pull requests, which must be reviewed and merged by someone with the appropriate permissions. This allows features to be validated on the staging platform before being promoted to production after approval.
By following this workflow, you ensure both security (so only authorized team members can deploy to staging and production) and reliability (by testing new features on a staging platform before deploying to production).